About:
- Monitor WMI Persistence
- Instructions about ExportsToC++
- My test of using DiskCleanup on Windows 10 using DiskCleanup
Contents:
- Introduction on how to log WMI Persistence in system logs, testing and analyzing bypass methods
- An auxiliary tool used in DLL hijacking, automatically reads DLL export functions and generates corresponding C++ code
- Practical test of 'using DiskCleanup on Windows 10 using DiskCleanup', documenting the process; although the test failed, the bypass ideas included are worth learning
0x01 Monitor WMI Persistence
---
Reference:
https://www.fireeye.com/blog/threat-research/2016/08/wmi_vs_wmi_monitor.html
Introduction
Attackers often exploit WMI for remote execution (e.g., wmiexec) and backdoor activities (e.g., WMI Persistence). However, Windows systems do not log these operations by default. Timothy Parisi and Evan Pena proposed their solution:
Record the attacker's WMI operations using WMI Persistence methods and write the following results to the system logs. Monitor the system logs in real-time to promptly alert users of attacks.
- Event Consumer Name
- Event Consumer Command
- Process Call Method
- Process Call Command
Actual Testing
The author has open-sourced a PowerShell script. The download link is as follows:
https://github.com/realparisi/WMI_Monitor/blob/master/WMIMonitor.ps1
Note:
PowerShell version 3.0 or higher is required.
Run with administrator privileges.
Test System:
Windows 8.1 x86
PowerShell v3.0
1、Run script to enable monitoring
As shown in the figure

2.Simulate an attacker creating a scheduled backdoor
The PowerShell code is as follows:
$filterName = 'BotFilter82' |
The code to implement directly in cmd using wmic is as follows:
wmic /NAMESPACE:"\\root\subscription" PATH __EventFilter CREATE Name="BotFilter82", EventNameSpace="root\cimv2",QueryLanguage="WQL", Query="SELECT * FROM __InstanceModificationEvent WITHIN 60 WHERE TargetInstance ISA 'Win32_PerfFormattedData_PerfOS_System'" |
Note:
The specific meanings of the code have been detailed in "WMI Attacks", "WMI Backdoor", "WMI Defense", and "Study Notes of WMI Persistence using wmic.exe", and are omitted here.
3.View system logs
Control Panel > System and Security > View event logs > Event Viewer (Local) > Windows Logs > Application
Locate events with Event ID 8, and view the details, as shown in the figure
The following information is recorded:
==New WMI Consumer Created==
Consumer Name: BotConsumer23
Command Executed: C:\Windows\System32\notepad.exe
4.Conclusion
System logs successfully recorded the backdoor left by the attacker
Thinking from the attacker's perspective
If the attacker can achieve WMI Persistence, it means they have already obtained administrator privileges. The following commands can be used to view registered WMI information:
Code for viewing via PowerShell:
Filters:
Get-WMIObject -Namespace root\Subscription -Class __EventFilter
Event Consumers:
Get-WMIObject -Namespace root\Subscription -Class __EventConsumer
Event Bindings:
Get-WMIObject -Namespace root\Subscription -Class __FilterToConsumerBinding
Code for viewing via WMIC:
Filters:
wmic /NAMESPACE:"\\root\subscription" PATH __EventFilter GET __RELPATH /FORMAT:list
Event Consumers:
wmic /NAMESPACE:"\\root\subscription" PATH CommandLineEventConsumer GET __RELPATH /FORMAT:list
Event Bindings:
wmic /NAMESPACE:"\\root\subscription" PATH __FilterToConsumerBinding GET __RELPATH /FORMAT:list
As shown in the figure, it is possible to view the monitoring code left by defenders, and of course, the monitoring can be deleted via command line. More importantly, the viewing and deletion operations will not be logged.

The deletion code implemented via PowerShell is as follows:
Get-WmiObject __eventFilter -namespace root\subscription -filter "name='_PersistenceEvent_'"| Remove-WmiObject |
In summary, from an attacker's perspective, possible bypass methods are as follows:
(1) View EventFilter and EventConsumer instances
(2) Delete WMI instances with monitoring functionality
(3) Leave behind one's own WMI backdoor
(4) Manually re-enable monitoring function WMI instance
Supplement
The publicly available POC PowerShell script is for demonstration purposes only; in actual defense, the following operations should be recorded:
_FilterToConsumerBinding, __EventFilter, and __EventConsumer instances
- Windows 10 and Server 2016 will address the above issues
Matt Graeber@mattifestation:
"in Win 10 and I believe Server 2016, Event 5861 in
Microsoft-Windows-WMI-Activity/Operational now captures WMI
persistence.
Quoted from: https://twitter.com/mattifestation/status/766269596756312064
0x02 Instructions about ExportsToC++
Reference:
http://uacmeltdown.blogspot.nl/
https://enigma0x3.net/2016/08/15/fileless-uac-bypass-using-eventvwr-exe-and-registry-hijacking/
https://github.com/michaellandi/exportstoc
Introduction
DLL hijacking is often used in achieving UAC bypass or persistence. To implement DLL hijacking, one typically first uses dumpbin to view the exported functions of a DLL, constructs a DLL with the same exported functions, and adds a payload within it. ExportsToC++ is designed to simplify this process, especially for DLLs containing multiple exported functions, greatly streamlining the procedure.
Actual Testing
Download link is as follows:
https://github.com/michaellandi/exportstoc
Required Environment:
.NET 2.0 Framework
Install Microsoft Visual Studio
Test Example:
https://enigma0x3.net/2016/08/15/fileless-uac-bypass-using-eventvwr-exe-and-registry-hijacking/
https://an-open-source-project/Userland-registry-hijacking/
Purpose:
Hijack the scheduled task UserTask to achieve launching a custom DLL on startup, displaying a pop-up
Method:
- Create a new key under HKEY_CURRENT_USER\Software\Classes\CLSID\ named {58fb76b9-ac85-4e55-ac04-427593b1d060}
- New item InprocServer32
- Set value to the absolute path of the new dll: c:\test\testexport.dll
Original hijacked dll path:
c:\Windows\system32\dimsjob.dll
Steps:
1.Run exportstoc
Download the project and compile; running directly will cause an error, as shown in the figure

Solution:
Running dumpbin requires a VS compilation environment. Find Developer Command Prompt for VS2012.lnk in Visual Studio Tools and run it, then execute ExportsToC++.exe in the popped-up cmd
2.Generate C++ code
As shown in the figure
Open the original DLL:
c:\Windows\system32\dimsjob.dll
Select Convert-To C++ Wrapper, enter the absolute path of the original DLL:
c:\\Windows\\system32\\dimsjob.dll
Automatically generate usable C++ code, as follows:
#include |
As shown in the figure
3.Compile
Create a new DLL project using VC6.0, add the above code, and include the payload:
MessageBox(NULL,"testexport","testexport",MB_OK);
Compile and save as c:\test\testexport.dll
4.Modify the registry to hijack UserTask
The PowerShell code is as follows:
function Invoke-ScheduledTaskComHandlerUserTask |
5、Log off the user and restart for testing
Popup successful
As shown in the figure
Use Process Explorer to view the process taskhost.exe, successfully loaded the new dll, as shown in the figure
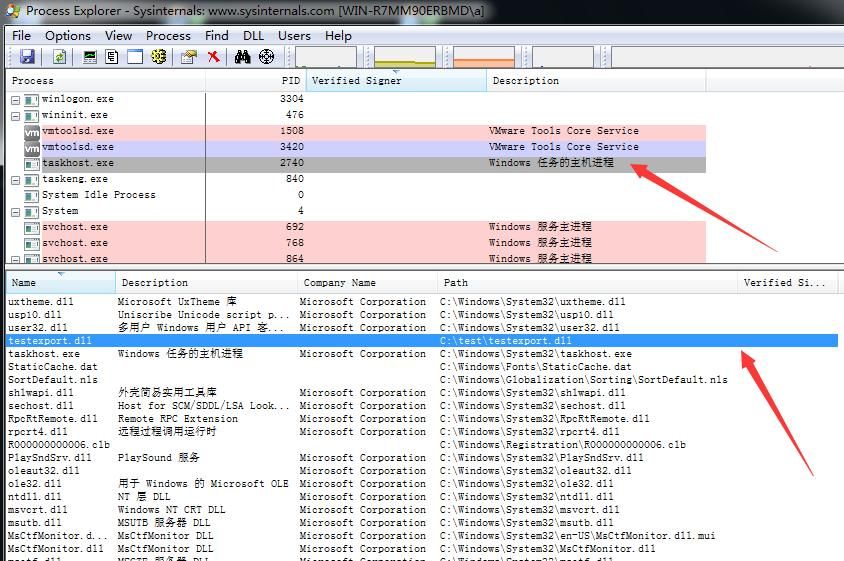
Note:
The method used in https://some-open-source-project/Userland-registry-hijacking/ causes an error in the taskhost.exe process after the pop-up, without providing a solution for the bug. The approach described in this article can resolve this bug.
0x03 My test of using DiskCleanup on Windows 10 using DiskCleanup
Reference:
https://enigma0x3.net/2016/07/22/bypassing-uac-on-windows-10-using-disk-cleanup/
Introduction
In the Windows 10 system, there is a scheduled task called "SilentCleanup". When the task runs, it performs the following operations:
- Run cleanmgr.exe with high privileges.
- Create a temporary directory C:\Users\\AppData\Local\Temp\GUID.
- Copy DismHost.exe and the DLLs required for its runtime from system32\Dism to this temporary directory.
- Run DismHost.exe with high privileges.
- Delete all contents of the temporary directory.
Bypass Idea
- Monitor the creation of the temporary directory.
- Replace the DLL copied to this temporary directory. To ensure timeliness, overwrite the last DLL loaded by DismHost.exe: LogProvider.dll.
- DismHost.exe loads replaced DLLs during startup to achieve UAC bypass
POC script
Download link:
https://gist.github.com/mattifestation/b4072a066574caccfa07fcf723952d54
Actual testing
Test system:
Win10 x64
Patch:
KB3173428 (cannot be manually uninstalled)
Testing process:
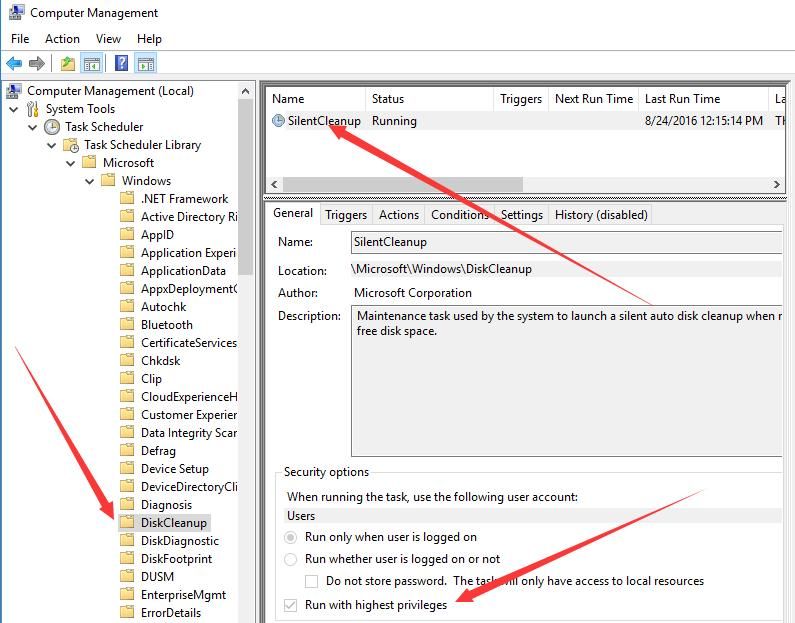
1.Normally start the scheduled task SilentCleanup
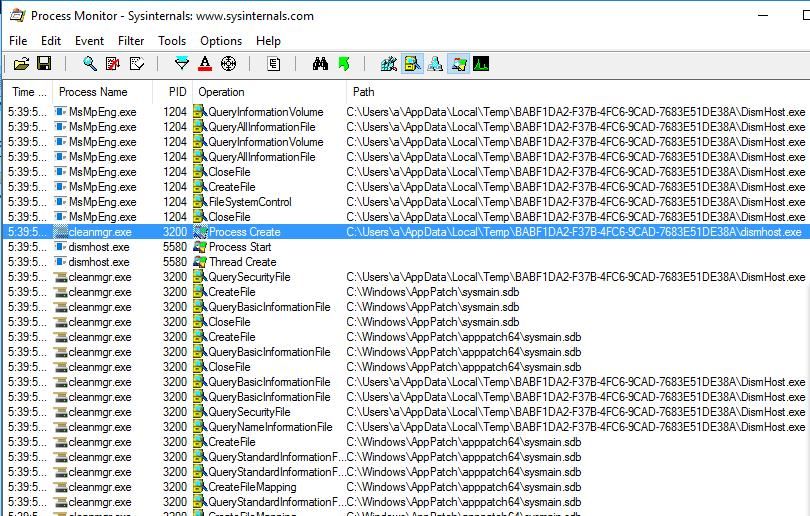
Enable ProcessMonitor
Manually start the service SilentCleanup
As shown in the figure
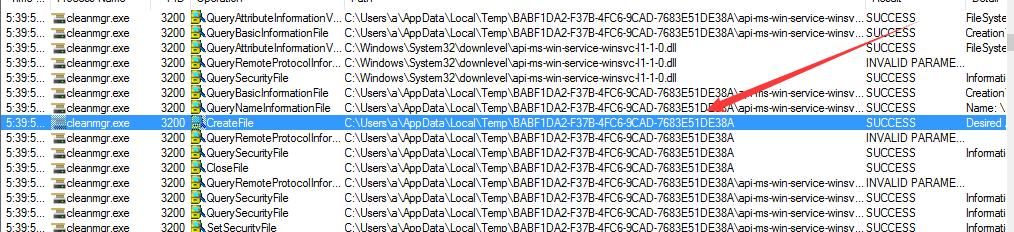
cleanmgr.exe creates a temporary directory
As shown in the figure
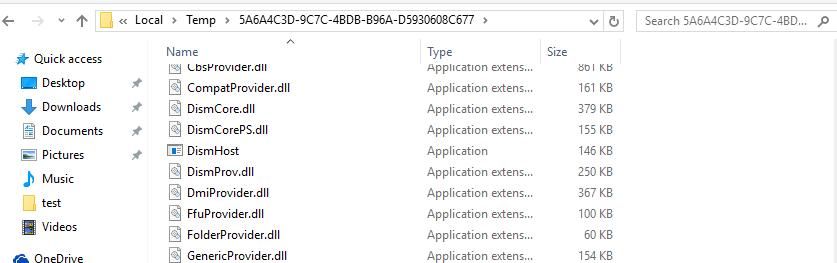
Switch to the temporary directory to view the copied dll
As shown in the figure
DismHost.exe running with high privileges
As shown in the figure
2.Start the scheduled task and test using the POC script
Enable ProcessMonitor
Write a new dll based on the export functions of LogProvider.dll (process omitted, refer to 0x02)
Execute the poc script
Temporary directory created successfully
Two scenarios may occur next:
(1) LogProvider.dll replacement failed
(2) The script shows the DLL file replacement succeeded, output indicates UAC bypass successful, but the new DLL is not loaded
Checking the temporary directory reveals two GUID folders created: one containing the normal LogProvider.dll directory, and another where LogProvider.dll is replaced with the new DLL
DismHost.exe starts normally but does not load the new DLL
Test failed
Additional note:
Although the test failed, the bypass approach is worth learning:
- The POC uses WMI event registration to monitor a specific file directory
- When specific files are generated in the directory, they are replaced
- Thereby achieving DLL hijacking
This replacement approach can also be applied in other contexts, worth bookmarking.