0x00 Preface
---
Sophos UTM and Sophos XG are two distinct products; the former leans towards general threat management, while the latter focuses on hardware firewalls. This article will introduce the method for setting up a Sophos XG vulnerability debugging environment.
0x01 Introduction
---
This article will cover the following:
- Environment Setup
- Jetty Debugging Environment Setup
- CSC Configuration File Decryption
- PostgreSQL Database Query
0x02 Fundamentals
---
Architecture as shown in the diagram below
Note:
Image referenced from https://codewhitesec.blogspot.com/2020/07/sophos-xg-tale-of-unfortunate-re.html
Overall, it is divided into the following three parts:
- Jetty: Processes web data and forwards it to csc for further processing
- csc: Main program: Loads Perl Packages and implements core functionalities
- Postgresql: Used for data storage
During my actual research, I encountered the following issues with these three parts:
- Jetty: Unable to start Java after adding debugging information
- csc: csc automatically deletes after loading Perl Packages, making it impossible to obtain implementation details of the Perl Packages
- Postgresql: Low user privileges prevent querying database tables
The following will introduce solutions to these three problems one by one
0x03 Environment Setup
---
Reference Materials:
https://docs.sophos.com/nsg/sophos-firewall/18.5/Help/en-us/webhelp/onlinehelp/VirtualAndSoftwareAppliancesHelp/VMware/VMwareInstall/index.html
1. Download the installation package
The official website only provides downloads for the latest version by default, but older versions can be downloaded by guessing the correct version number
For example, 18.5.3 Virtual Installers: Firewall OS for VMware:
https://download.sophos.com/network/SophosFirewall/installers/VI-18.5.3_MR-3.VMW-408.zip
18.5.2 Virtual Installers: Firewall OS for VMware:
https://download.sophos.com/network/SophosFirewall/installers/VI-18.5.2_MR-2.VMW-380.zip
2. Import to VMware Workstation
After downloading the zip file, extract it and run sf_virtual.ovf
3. VMware Workstation network adapter configuration
Two network adapters, VMnet7 and VMnet8, need to be added. Set VMnet7 to Host-only with 172.16.16.0, and VMnet8 to NAT. The specific steps are as follows:
(1) VMnet7
Open VMware Workstation, then select Edit -> Virtual Network Editor...
Add Network... -> VMnet7
Set VMnet7 as follows:
- Type: Host-only
- Subnet Address: 172.16.16.0
(2) VMnet8
VMnet8 is set to:
- Type: NAT
4. Sophos XG Network Card Configuration
Network Adapter set to VMnet7
Network Adapter 2 set to VMnet8
Network Adapter 3 set to VMnet8
Configuration as shown in the figure below
5. Start Sophos XG
Default login password: admin
6. View IP Address
Enter in sequence: 1. Network Configuration -> 1. Interface Configuration
Obtain LAN IP as 172.16.16.16
7. Access the web configuration page for activation
Access https://172.16.16.16:4444 via browser
On the registration page, select: I don't have a serial number (start a trial)
Proceed with registration as prompted
After successful registration, re-access https://172.16.16.16:4444 for configuration
0x04 Jetty debugging environment setup
---
1. Check Java process related information
Execute command: ps ww|grep java
Output:
java 3238 923 root 1393m 264m S /lib/jvm/java-11-openjdk/bin/java -Xmx384m -Xms12m -Xss256k -XX:MaxMetaspaceSize=100m -Dhybrid.enabled=false -Djna.tmpdir=/tmp/java -Djava.io.tmpdir=/tmp/java -Dsun.jnu.encoding=UTF-8 -Dfile.encoding=UTF-8 -Djava.awt.headless=true -Djetty.home=/usr/share/jetty -Djetty.base=/usr/share/jetty -jar /usr/share/jetty/start.jar --lib=/usr/share/webconsole/properties/ |
From the output, obtain Java version as java-11-openjdk
2. Locate configuration file
Configuration file path is /usr/bin/jetty, with content as follows:
#!/bin/sh |
3. Add debugging parameters
Modify file attributes: mount -o rw,remount /
Add debugging parameters on the exec line: "-agentlib:jdwp=transport=dt_socket,server=y,suspend=n,address=*:8000"
4. Restart service
Execute command: service tomcat:restart -ds nosync
Check service status: service -S | grep tomcat
Found tomcat status is STOPPED
To obtain detailed error information, directly run /usr/bin/jetty
Output:
Error occurred during initialization of VM |
Identified as a JDK issue, opting to replace with a complete JDK here
5. Replace JDK
Download jdk-11.0.15_linux-x64_bin.tar.gz and upload to Sophos XG
Backup original folder: cp -r /lib/jvm/java-11-openjdk /lib/jvm/java-11-openjdk_backup
Extract jdk-11.0.15_linux-x64_bin.tar.gz: tar zxvf /tmp/jdk-11.0.15_linux-x64_bin.tar.gz
Replace /lib/jvm/java-11-openjdk:
rm -rf /lib/jvm/java-11-openjdk |
6. Restart service again
Execute command: service tomcat:restart -ds nosync
Check service status: service -S | grep tomcat
Found tomcat status as RUNNING
Confirm parameters were modified, execute command: ps ww|grep java
Output:
java 1827 923 root 1454m 158m S /lib/jvm/java-11-openjdk/bin/java -Xmx384m -Xms12m -Xss256k -XX:MaxMetaspaceSize=100m -Dhybrid.enabled=false -Djna.tmpdir=/tmp/java -agentlib:jdwp=transport=dt_socket,server=y,suspend=n,address=*:8000 -Djava.io.tmpdir=/tmp/java -Dsun.jnu.encoding=UTF-8 -Dfile.encoding=UTF-8 -Djava.awt.headless=true -Djetty.home=/usr/share/jetty -Djetty.base=/usr/share/jetty -jar /usr/share/jetty/start.jar --lib=/usr/share/webconsole/properties/ |
7. Modify firewall rules
Execute command: iptables -I INPUT -p tcp --dport 8000 -j ACCEPT
8. Use IDEA for remote debugging
As shown in the figure below
During debugging, if you encounter a situation where breakpoints cannot be set, restart the Java service: service tomcat:restart -ds nosync
0x05 CSC configuration file decryption
---
View CSC process related information
Execute command: ps ww|grep csc
Partial output:
csc 859 1 root 25916 23600 S csc -L 3 -w -c /_conf/cscconf.bin |
The csc process reads /_conf/cscconf.bin as the configuration file, and /_conf/cscconf.bin is an encrypted file, so it is necessary to decrypt /_conf/cscconf.bin here.
The method I adopted here is to modify the program code through IDA, change the implementation logic, and export the decrypted configuration file.
Load csc using IDA, examine the implementation logic of the main() function, partial code:
signed int __cdecl csc_main(int a1, char *const *a2) |
Analyzing the above code, csc first calls the extract_conf() function to export configurations, and finally executes the system command rm -rf /_conf/csc/csc /_conf/csc/csc.conf /_conf/csc/cscconf/ /_conf/csc/constants.conf /_conf/csc/cscconf.tar.gz /_conf/csc/global.conf /_conf/csc/cfsconf /_conf/csc/service /_conf/csc/bind_file_list to delete configuration files, preventing us from directly obtaining the relevant configuration files.
Examining the implementation code of the extract_conf() function:
unsigned int __cdecl extract_conf(int a1) |
Based on the analysis of the above code, csc first calls the sub_8052494() function to decrypt /_conf/csc/cscconf.tar.gz, then executes the system command tar -zxf /_conf/csc/cscconf.tar.gz -C /_conf/csc to extract the configuration files to the folder /_conf/csc.
Based on the comprehensive analysis above, we can adopt the following method to export the configuration files: modify the csc program to change the extraction path from /_conf/csc to another path, such as /var/aaaaa. Then, when csc attempts to delete the configuration files, it will fail because it specifies a fixed absolute path, preventing it from deleting the new folder. This allows us to obtain the complete configuration files.
The specific implementation method is as follows:
(1) Modify csc
Load csc using IDA, view Exports, find extract_conf, double-click to enter IDA View, locate the string tar -zxf /_conf/csc/cscconf.tar.gz -C /_conf/csc, as shown below
Switch to Hex View, as shown below
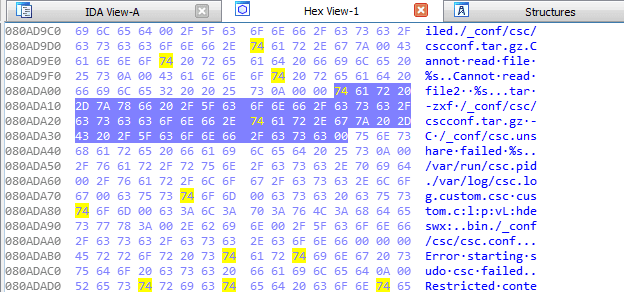
Change /_conf/csc to /var/aaaaa, as shown below
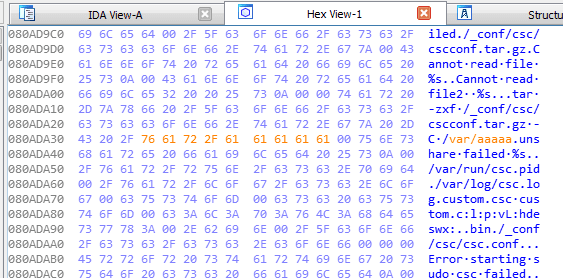
Right-click and select Apply changes
Select Edit->Patch program->Apply patches to input file...->OK in sequence to generate the new file csc
(2) Replace csc
Log in via SSH, upload the new file csc, save to /tmp/csc
Back up csc and replace it, execute the following commands:
mount -o rw,remount / |
(3) Confirm whether the configuration file was exported successfully
Wait for the system to reboot, enter the underlying shell, and sequentially input 5.Device Management->3.Advanced Shell
Check the folder /var/aaaaa, as shown in the figure below
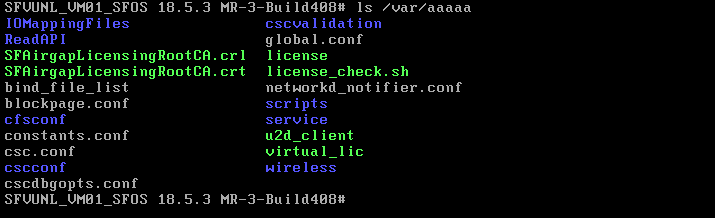
Configuration file exported successfully
(4) Restore csc
mount -o rw,remount / |
(5) Download the configuration file
Log in via SSH and download the contents from the folder /var/aaaaa
0x06 PostgreSQL Database Query
---
Check port information by executing the command: netstat -tulpen | grep postgres
Output:
tcp 0 0 127.0.0.1:5432 0.0.0.0:* LISTEN 65534 3800 1087/postgres |
Through investigation, it was found that the connection information for the above three databases corresponds to the following three files:
- /usr/share/webconsole/properties/ConnectionPool.cfg
- /usr/share/webconsole/properties/ConnectionPoolForReports.cfg
- /usr/share/webconsole/properties/ConnectionPoolForSignature.cfg
The configuration information in the files is as follows:
- JDBCConnectionURL=jdbc:postgresql://127.0.0.1:5432/corporate?user=pgrouser&autoReconnect=true
- JDBCConnectionURL=jdbc:postgresql://127.0.0.1:5433/iviewdb?user=pgrouser&autoReconnect=true
- JDBCConnectionURL=jdbc:postgresql://127.0.0.1:5434/signature?user=pgrouser&autoReconnect=true
Test command 1:
psql -p 5432 corporate -U pgrouser |
Output:
ERROR: permission denied for relation pg_class |
Indicates insufficient permissions
Test command 2:
psql -p 5432 corporate -U pgrouser |
Able to retrieve user information
Note:
User pgrouser has identical permissions as nobody
From the above information, both users pgrouser and nobody are non-root users with limited functionality. Next, attempt to locate the root user
Examine the decrypted csc configuration file, locate \service\postgres.csc. Key file content:
EXEC /bin/synccmd "/sbin/pg_dump -U pgroot corporate -a --disable-triggers -t tblhavmac -f /tmp/corphavmac" |
Locate the key user pgroot
Test command 3:
psql -U pgroot -d corporate |
Execution successful
0x07 Summary
---
This article introduces solutions to some problems encountered during the setup of the Sophos XG debugging environment.