0x00 Preface
---
In the previous article 'Introduction to Windows Password Hashes - NTLM Hash and Net-NTLM Hash', we compared the differences between NTLM hash and Net-NTLM hash. This article will continue to discuss the application of Net-NTLM hash in internal network penetration, addressing an interesting question:
If you obtain access to an internal file server, how can you acquire passwords from more users?
0x01 Introduction
---
This article will cover the following topics:
- Methods for network packet capture on Windows without installing any third-party dependencies
- Converting packet data to pcap format
- Analyzing packets using Wireshark
- Writing Python scripts to extract NTLMv2 Hash
- Cracking the Hash using Hashcat
0x02 Solution Approach
---
As mentioned in 'Introduction to Password Hashes under Windows – NTLM Hash and Net-NTLM Hash', when a client connects to a file server, it sends the password hash of the currently logged-in user to the server for verification by default. If verification fails, the login username and password need to be re-entered.
If access to a file server within the internal network is obtained, when other hosts in the internal network attempt to access this server via the interface, they first send their own password hash to the server for verification. Capturing data packets on the server side can yield the NTLM Response. By parsing the format of the NTLM Response, extracting specific information, and using Hashcat for dictionary or brute-force attacks, it is possible to recover the plaintext password of the user's local machine.
Therefore, the first issue to address next is:How to capture data packets on the file server?
0x03 Methods for Network Packet Capture on Windows Platform
---
The most common method is, of course, to install Wireshark. However, wouldn't it be better if there were a method that doesn't require installing any third-party dependencies, is built into the system, and can be used directly for packet capture?
Such a method does exist.
Using the trace feature in Windows' built-in netsh allows packet capture via the command line without installing any third-party dependencies.
Supported on Windows 7, Server 2008 R2, and later systems, but not on Server 2008.
Official documentation:
https://technet.microsoft.com/en-us/library/dd878517%28v=ws.10%29.aspx
Note:
netsh trace requires administrator privileges.
Usage method:
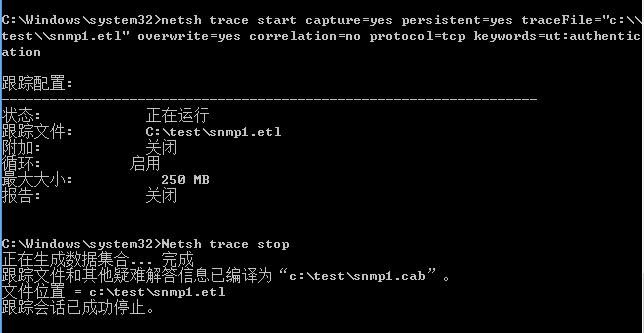
1. Enable logging function
netsh trace start capture=yes persistent=yes traceFile="c:\\test\\snmp1.etl" overwrite=yes correlation=no protocol=tcp ipv4.address=192.168.62.130 keywords=ut:authentication |
Parameter description:
- capture=yes: Enable packet capture function
- persistent=yes: Packet capture function remains active after system reboot and can only be stopped via Netsh trace stop
- traceFile: Specify the path to save the log file
- overwrite=yes: If the file exists, overwrite it
- correlation=no: Do not collect correlation events
- protocol=tcp: Capture TCP protocol
- ipv4.address=192.168.62.130: Limit capture to data packets related to the server IP only
- keywords=ut:authentication: Keyword is ut:authentication
Adding the above limiting parameters is to minimize packet size as much as possible, filtering only content related to NTLMv2 authentication within the SMB protocol
Note:
A system configuration file archive with the suffix .cab will be generated in the same directory
2. Disable logging function
Netsh trace stop |
After disabling the feature, the system saves the captured packets as a file with an .etl extension
Demonstration as shown in the figure below
3. View the .etl file
The .etl file cannot be opened directly; it requires the use of Windows Message Analyzer to convert it into .cap format (recognizable by Wireshark)
Windows Message Analyzer download link:
https://www.microsoft.com/en-us/download/confirmation.aspx?id=44226
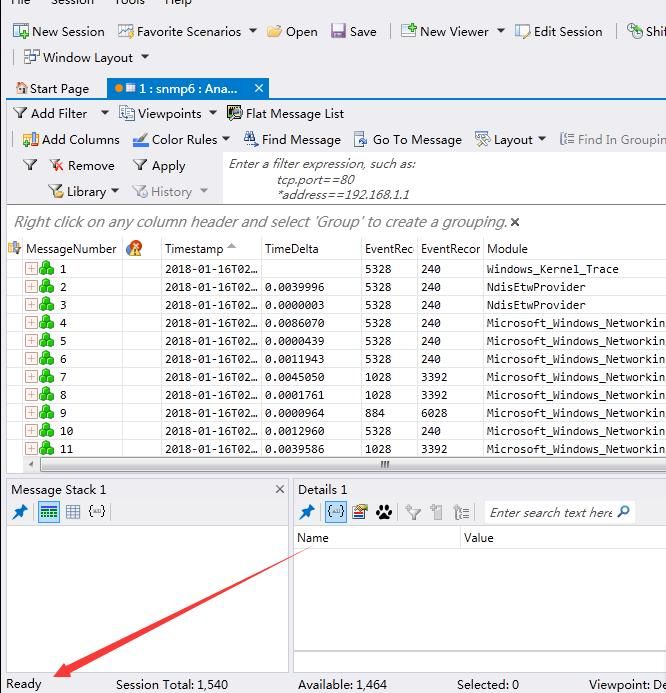
After installation, open the .etl file and wait for it to be recognized. Once successfully recognized, the bottom left corner of the interface will display 'Ready', as shown in the figure below
4. Convert to .cap format
File-Save as-Export, save as a .cap packet format
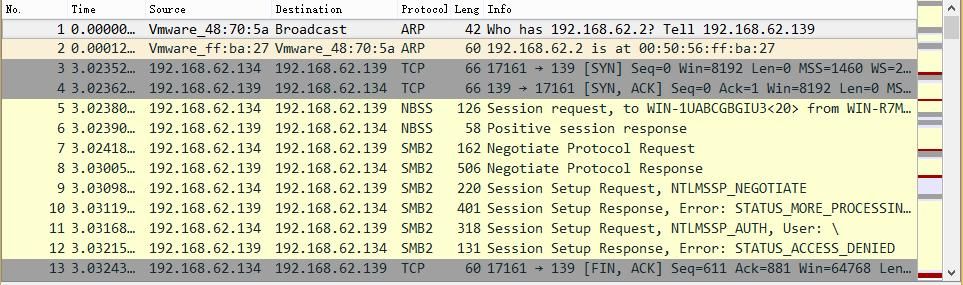
Open the .cap packet file with Wireshark to successfully read the packet file and obtain the packets from the server
The SMB2 protocol can be found in the packets, as shown in the figure below
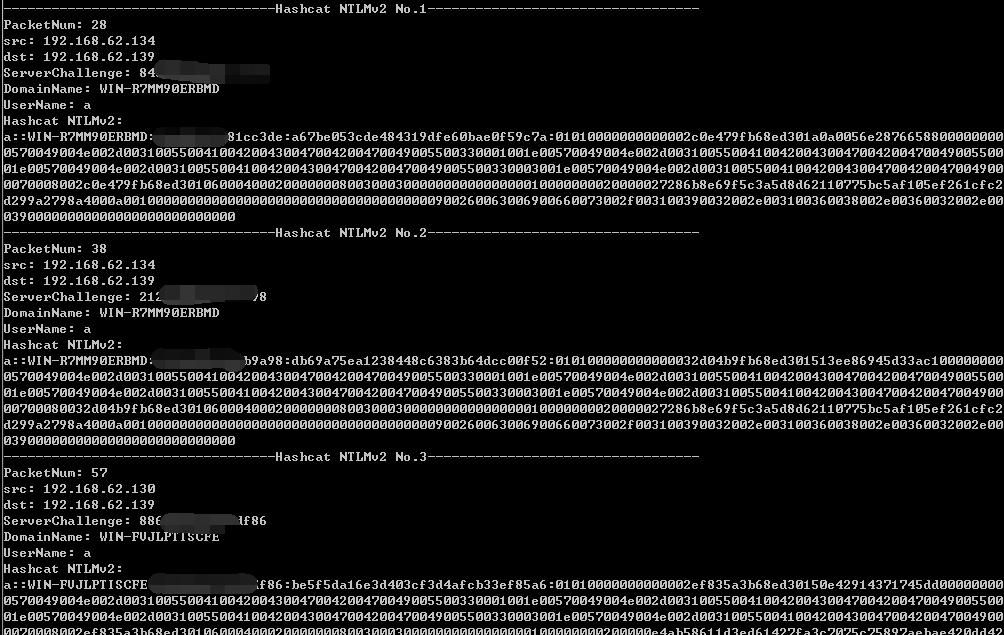
Extract a set of data packets and restore the key information of NTLM v2, as shown in the figure below
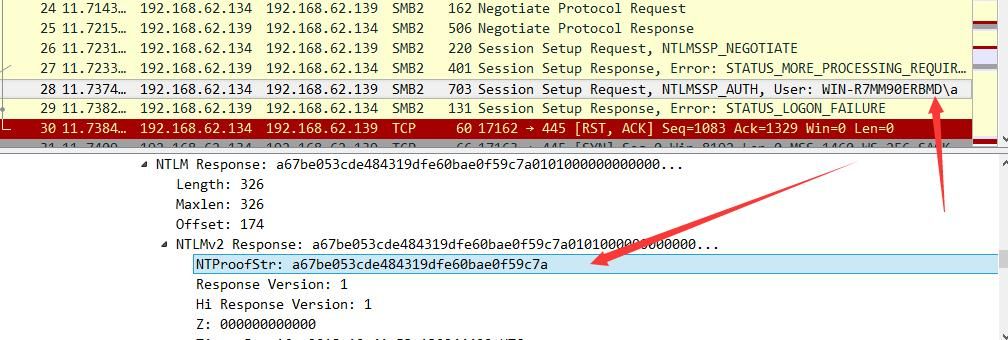
Concatenate in a fixed format: username::domain:challenge:HMAC-MD5:blob
Use Hashcat for cracking
Note:
For detailed cracking methods, please refer to the article 'Introduction to Windows Password Hashes – NTLM hash and Net-NTLM hash'. This article will not demonstrate it further.
Manually assembling multiple NTLM v2 response packets is time-consuming and labor-intensive, so it is necessary to write a program to automatically parse the data packets and extract the NTLM v2 content usable by Hashcat.
This leads to the second question:How to implement automatic packet parsing through a program to extract NTLM v2 content?
0x04 Implementing Automatic Packet Parsing via Program
---
Development language: Python
Python module: scapy
Reference address:
https://github.com/invernizzi/scapy-http
Installation:
easy_install scapy |
Scapy can parse pcap packets, so before using it, first convert .cap files to pcap format using Wireshark
Scapy example code:
try: |
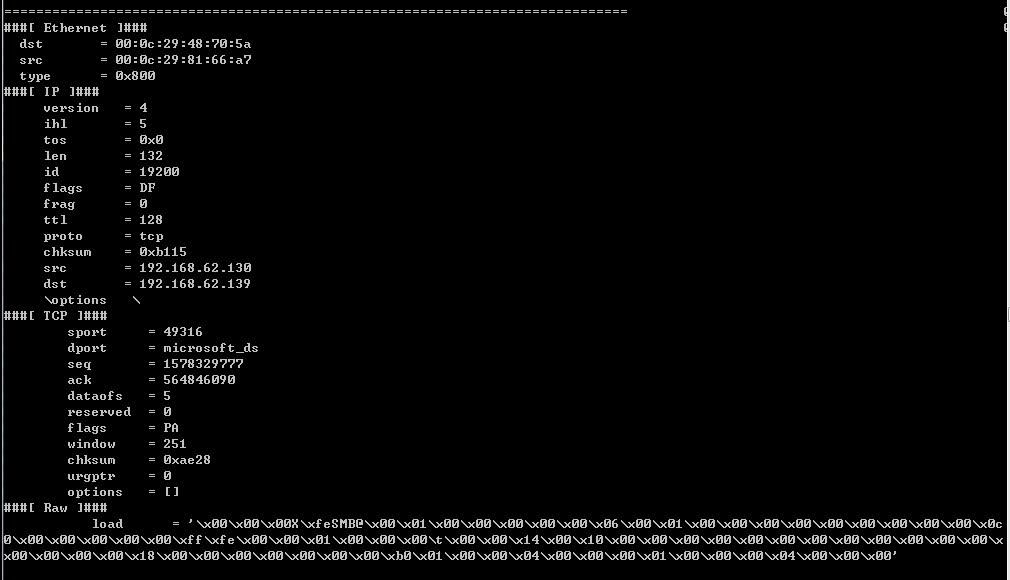
Automatically parse the format of each packet, divided into Ethernet, IP, TCP, and Raw, as shown in the figure below
Program development approach:
- Determine the destination port to select packets of the SMB protocol
- Filter out NTLMv2 Response packets
- Obtain username, domain, HMAC-MD5, and blob from the current packet
- Obtain Server challenge from the previous packet
Specific implementation:
1. Select packets of the SMB protocol
Destination port is 445
packets[p]['TCP'].dport == 445 |
2. Filter out NTLMv2 Response packets
TCP payload contains the special string NTLMSSP
packets[p]['Raw'].load.find('NTLMSSP') != -1 |
3. Obtain username, domain, HMAC-MD5, and blob from the current packet
HMAC-MD5 and blob are at fixed positions and can be obtained directly via fixed offsets
Username and domain follow a fixed format: 2 bytes represent Length, 2 bytes represent Maxlen, 4 bytes represent offset. Note that the 2-byte length is actually an int value; when reading, the high and low bytes must be swapped
For example, if the read hex data is 4601, the actual calculated value is 0146 converted to decimal, which is 326
DomainLength1 = int(TCPPayload[Flag+28:Flag+28+1].encode("hex"),16) |
Domain is stored in Unicode format and needs to be converted to ASCII. The specific implementation is to convert the string to an array and take only the odd positions
DomainName = [DomainNameUnicode[i] for i in range(len(DomainNameUnicode)) if i%2==0] |
Complete implementation code is as follows:
#!/usr/bin/env python |
After execution, the program output is as shown in the figure below
Then use Hashcat to perform the cracking
Note:
Open-source tools for parsing pcap files:
https://github.com/DanMcInerney/net-creds
However, a bug occurs when parsing the NTLMv2 challenge
0x05 Supplement
---
For file servers, if NetBIOS over TCP/IP is enabled, after disabling port 445, the system will attempt to connect using port 139
Test as follows:
Server disables port 445 and enables port 139
Client attempts to connect, SMB protocol uses port 139, packet capture as shown below
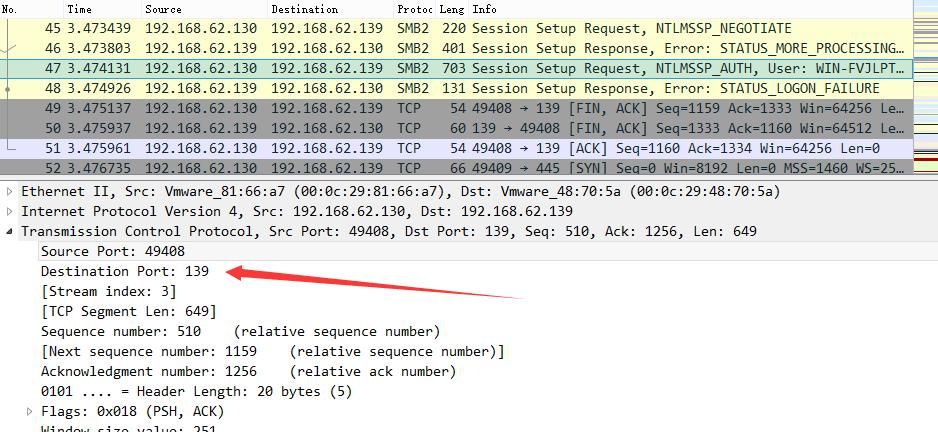
If NetBIOS over TCP/IP is disabled, file sharing cannot be used after disabling port 445
0x06 Summary
---
This article addresses the issue of obtaining passwords for more users after gaining access to an internal file server.
By capturing SMB protocol content via Windows command line, writing a program to automatically extract NTLMv2 Hash, and using Hashcat for cracking, it is possible to recover the user's local plaintext password.