0x00 Preface
---
In internal network penetration, information gathering is particularly important.
Facing the complex environment of internal networks, although network scanning can easily expose oneself, scanning can discover information such as surviving hosts, open ports, running services, and operating systems within the internal network, laying the foundation for further penetration.
When selecting scanning tools, one must consider not only functionality but also the applicability of the tools.
In reality, the pivot machine is often not a Linux server and lacks a suitable environment to install Nmap, Zmap, and Masscan.
In other words, which command-line scanning tools can be used directly under Windows?
The well-known open-source scanning tools Nmap, Zmap, and Masscan each have their own unique features in terms of functionality.
In terms of applicability, Zmap requires the installation of Cygwin to run on Windows, so it is not within the scope of consideration.
Masscan supports compilation for the Windows platform, and Nmap provides a command-line version, making Masscan and Nmap appear to meet the requirements.
However, both Masscan and Nmap require WinPcap support, meaning WinPcap must be installed before use.
So, can WinPcap be installed via the command line?
0x01 Introduction
---
This article aims to address the above issues and introduces the following content:
- Compiling Masscan on Windows Platform
- Installing WinPcap via Windows Command Line
- Introduction to Using Masscan
- Introduction to Configuring and Using Nmap
0x02 Compiling Masscan on Windows Platform
---
Masscan Download Address:
https://github.com/robertdavidgraham/masscan/
Compilation Tool: vs2012
The compilation options do not include configuration for vs2012, so direct compilation will result in errors
Solution:
Add vs2012 configuration information in string_s.h
Located in misc-string_s.h, add the following code:
#if defined(_MSC_VER) && (_MSC_VER == 1700) |
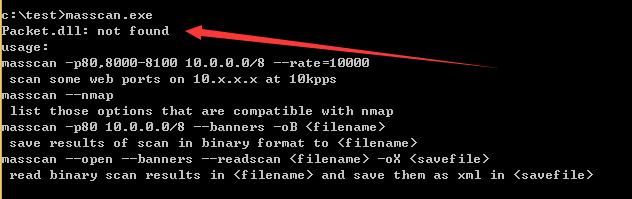
Compilation successful, executing masscan.exe, prompts Packet.dll: not found
As shown in the figure below
Method to obtain Packet.dll:
After installing WinPcap, obtain it under System32
WinPcap download address:
https://www.winpcap.org/install/default.htm
Install WinPcap on another system, locate Packet.dll and Wpcap.dll under System32, copy them to the same directory as masscan.exe on the test system, and run again
The program starts normally but cannot scan, reporting the following error:
`FAIL: Error opening adapter: The system cannot find the device specified. (20)
adapter[\Device\NPF_{71D19B82-0818-4685-A8E7-A6C7C812F2EA}].init: failed`
Question: Does the test system also need to install WinPcap to use it?
After actual testing, indeed it does
0x03 Installing WinPcap via Windows Command Line
---
Testing on a 32-bit system:
Using ProcessMonitor to monitor the WinPcap installation process (32-bit system), the following information was obtained:
- Releases packet.dll and wpcap.dll in the \system32\ folder
- Releases npf.sys in \system32\drivers\
- Installs the npf service
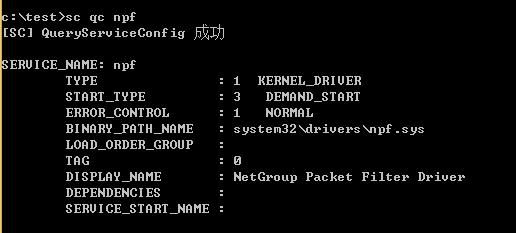
Obtain configuration information of the installed service npf through the sc command:
sc qc npf
Information obtained as follows:
[SC] QueryServiceConfig SUCCESS |
As shown in the figure below
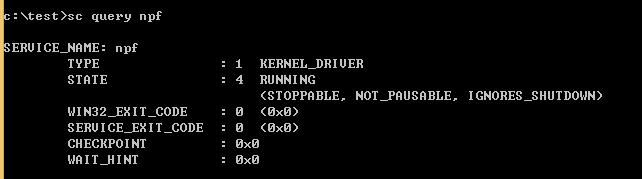
View running status:
sc query npf
Information obtained is as follows:
SERVICE_NAME: npf |
As shown in the figure below
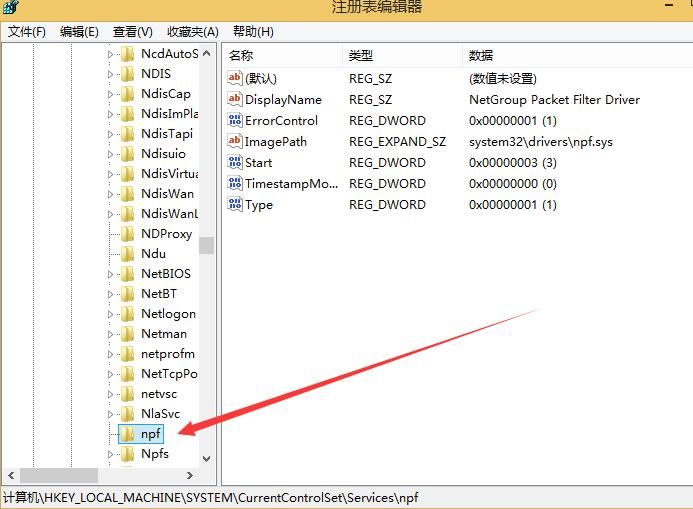
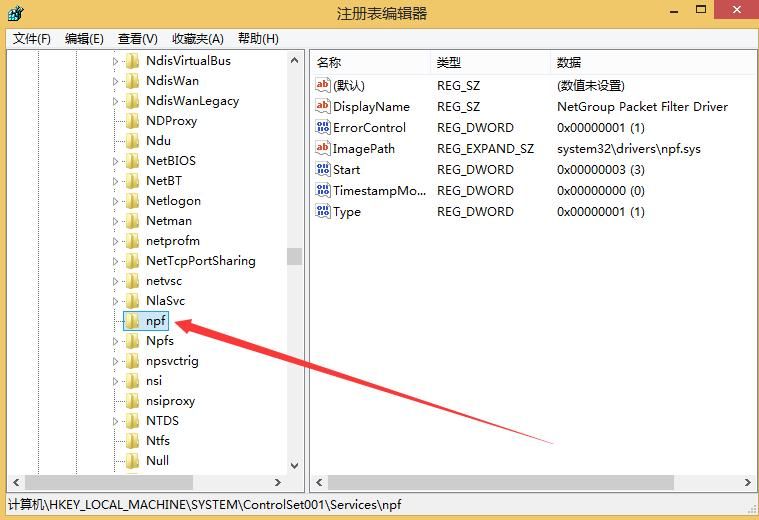
Corresponding registry keys and values will be created, indicating service configuration information, location as follows:
- HKEY_LOCAL_MACHINE\SYSTEM\ControlSet001\Services\npf
- HKEY_LOCAL_MACHINE\SYSTEM\CurrentControlSet\Services\npf
As shown in the figure below
As shown in the figure below
It is speculated that as long as the above installation operations can be simulated, WinPcap can be installed via the command line.
The simulated installation operations are as follows:
1. Release files
`
copy packet.dll %SystemRoot%\system32\
copy wpcap.dll %SystemRoot%\system32\
copy npf.sys %SystemRoot%\system32\drivers\`
2. Create service
`
sc create npf binPath= system32\drivers\npf.sys type= kernel start= demand error= normal tag= no DisplayName= "NetGroup Packet Filter Driver"
3. Start the service
sc start npf
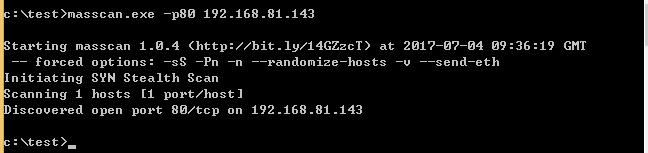
Test commands are as follows:
masscan.exe -p80 192.168.81.143
Successfully executed masscan.exe, as shown in the figure below
Test 64-bit system:
Using ProcessMonitor to monitor the WinPcap installation process (32-bit system), obtained the following information:
- Release 64-bit packet.dll and wpcap.dll in the \system32\ folder
- Release 64-bit npf.sys in the \system32\drivers\ folder
- Release 32-bit packet.dll, wpcap.dll, and pthreadVC.dll in the \syswow64\ folder
- Install the npf service
Through actual testing and optimization, when executing 32-bit masscan.exe in a 64-bit environment, 64-bit packet.dll and wpcap.dll are not required, 32-bit pthreadVC.dll is not required, only the 64-bit driver npf.sys needs to be installed
Moreover, whether on a 32-bit or 64-bit system, packet.dll and wpcap.dll can be placed in the same directory as masscan.exe (of course, since it is compiled with vs2012, msvcr110d.dll is also required)
That is to say, for 32-bit and 64-bit systems, it is only necessary to copy different versions of npf.sys to the \system32\drivers\ folder.
Then create the service npf and install it, and the entire process is completed.
Automate the above process through batch processing, the one-click installation script code is as follows:
@echo off |
The relevant code and required dll files have been uploaded to GitHub, the address is as follows:
An open-source project
0x04 Masscan Usage Introduction
---
Scan specified network segment and ports:
masscan.exe -p80 192.168.81.1/24
Found a server with port 80 open, response as follows:
Discovered open port 80/tcp on 192.168.81.143
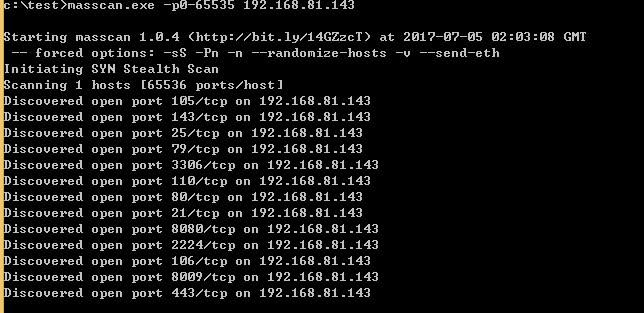
Scan all open ports on the specified host:
masscan.exe -p0-65535 192.168.81.143
As shown in the figure below
Scan specific ports on the specified host:
masscan.exe -p80,443 192.168.81.143
Retrieve banners:
masscan.exe -p80,443,3306 192.168.81.143 --banners
Start scan via configuration file:
Save configuration information in 1.conf:
masscan.exe -p80,443,3306 192.168.81.143 --banners --echo>1.conf
Read configuration file 1.conf and start scan:
masscan.exe -c 1.conf
Modify scanning speed to 100,000 packets/second (maximum 300,000 packets/second on Windows), default is 100 packets/second:
--rate 100000
Output formats:
-oX (XML) |
Additionally, by default, masscan enables the following configurations:
`
-sS: this does SYN scan only (currently, will change in the future)
-Pn: doesn't ping hosts first, which is fundamental to the async operation
-n: no DNS resolution happens
--randomize-hosts: scan completely randomized
--send-eth: sends using raw libpcap
0x05 Nmap Configuration and Usage Introduction
---
Nmap Zip Version Download Address:
https://nmap.org/dist/nmap-7.50-win32.zip
Using Nmap also requires installing WinPcap in advance via command line
Also add vs2013 dlls: msvcp120.dll and msvcr120.dll (Nmap.exe compiled with vs2013)
Remove irrelevant files, streamline nmap, final required support file list as follows:
- libeay32.dll
- msvcp120.dll
- msvcr120.dll
- nmap-mac-prefixes
- nmap-os-db
- nmap-payloads
- nmap-services
- nmap.exe
- ssleay32.dll
Scan specified network segment and ports:
nmap.exe -p80 192.168.81.1-255
or
nmap.exe -p80 192.168.81.1/24
Scan IP address list:
nmap.exe iL IP.txt
Scan all open ports on specified host:
nmap.exe 192.168.81.143
Scan specific ports on specified host:
nmap.exe -p80,443 192.168.81.143
Operating system detection (-O):
nmap.exe -O 192.168.81.143
Service version detection on ports (-sV):
nmap.exe -sV 192.168.81.143
Port scanning as shown in the figure below

Version detection as shown in the figure below
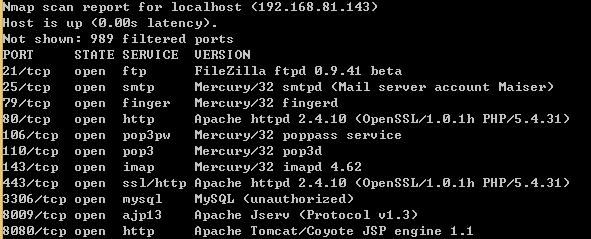
Comparison shows that version detection can identify service versions on ports
Note:
To restore version detection (-sV), the following files need to be added:
- nse_main.lua
- nmap-service-probes
- nselib folder and files within it
- scripts folder and files within it
Route information detection (--traceroute)
nmap.exe --traceroute 192.168.81.143
Comprehensive Detection (-A)
Includes operating system, service version, and routing information, essentially the combination of the above three
nmap.exe -A 192.168.81.143
Scan methods support the following parameters:
`
-sS/sT/sA/sW/sM: TCP SYN/Connect()/ACK/Window/Maimon scans
-sU: UDP Scan
-sN/sF/sX: TCP Null, FIN, and Xmas scans
--scanflags : Customize TCP scan flags
-sI : Idle scan
-sY/sZ: SCTP INIT/COOKIE-ECHO scans
-sO: IP protocol scan
-b : FTP bounce scan
`
Introduction to common scanning methods:
TCP SYN Scan (-sS)
- Half-open scanning, does not establish a full three-way handshake connection, very fast
- Default scanning method in nmap
TCP connect scan (-sT)
- Completes the three-way handshake process (SYN, SYN/ACK, ACK), but speed is reduced
- Easily detected
UDP scan (-sU)
- Scans UDP ports
TCP Null/FIN/Xmas scan (-sN/-sF/-sX)
- Used to determine if a port is open
- Can bypass some stateless firewalls
Null scan (-sN)
- Sets no flags (TCP flag header is 0)
FIN scan (-sF)
- Sets only the TCP FIN flag
Xmas scan (-sX)
- Set FIN, PSH, and URG flags
TCP ACK scan (-sA)
- Not used to determine if a port is open
- Used to discover firewall rules, determine whether firewall rules are stateful or stateless, and which ports are filtered
- Only set the ACK flag
Custom TCP scan (--scanflags)
- Manually specify arbitrary TCP flags to design custom scans
- Can be used to bypass intrusion detection systems
- Requires in-depth understanding of communication protocols
Idle scan (-sI)
- Spoof the source address of the scan
Note:
The host at this source address must be online
Can also spoof the source port, default is port 80
Forged source port format is as follows:
Example:
nmap.exe -sI 192.168.81.1:1234 192.168.81.143
PING Scan (-sP)
- Use ping to scan if the host is online
No PING Scan (-PN)
- Do not use ping for scanning
Note:
PN two letters are uppercase
Output format:
-oN (standard) |
Note:
https://nmap.org/book/ for more Nmap usage introduction
0x06 Summary
---
This article introduces the command-line usage of Masscan and Nmap on the Windows platform, while reminding everyone from a defensive perspective that internal network security is equally important and should be handled with caution.