0x00 Preface
---
Autodiscover is a service in Exchange designed to simplify the configuration process for client applications. Users only need to enter their email address and password to obtain the necessary configuration information for running client applications through the Autodiscover service.
In penetration testing, when we obtain the credentials of an email user, we can use the Autodiscover service to uncover more valuable information.
This article will introduce methods for reading configuration information through the Autodiscover service, provide open-source implementation code, and share exploitation ideas.
0x01 Introduction
---
This article will cover the following topics:
- Methods for password brute-forcing via Autodiscover
- Methods for reading configuration information via Autodiscover
- Methods for accessing Exchange email resources via Autodiscover
0x02 Methods for Password Brute-Forcing via Autodiscover
---
Corresponding URL: https:///autodiscover/autodiscover.xml
Authentication method: NTLM Over HTTP Protocol (supports both plaintext and NTLM hash login)
Login failure returns 401
Login success returns 200, content example:
|
We can see that the authentication process for Autodiscover is basically the same as EWS, so the code implementation can also refer to the previous code checkEWS.py
No further introduction here, specific details can refer to the previous article "Penetration Techniques - Pass the Hash with Exchange Web Service"
Refer to the checkautodiscover function in checkAutodiscover.py for implementation code.
0x03 Method for reading configuration information via Autodiscover
---
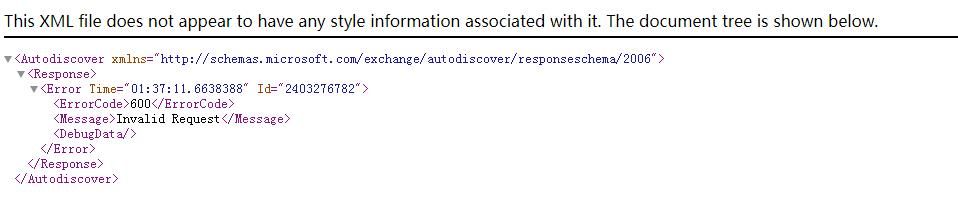
Directly access https:///autodiscover/autodiscover.xml via a browser
Unable to obtain configuration information; example content returned by the browser:
|
As shown in the figure below
To read configuration information, we need to perform the following operations:
1. Send a GET request, add NTLM authentication information in the Header, example: Authorization: NTLM xxxxxxxxxxx
URL is /autodiscover/autodiscover.xml
Specify the encoding format as gzip, format as follows:
Accept-Encoding: gzip |
2. Receive the returned result
Prompt 401 Unauthorized
3. Send a POST request
Complete NTLM authentication in the Header, and additionally add the following information (X-Anchormailbox) in the Header, specifying the current user's email address, example: X-Anchormailbox: [email protected]
The content format of the POST request is as follows:
|
where {EMailAddress} is the current user's email address
Complete packet example:
POST /autodiscover/autodiscover.xml HTTP/1.1 |
4. Receive the returned result
Indicates 200 OK
The returned Body content is in gzip compressed format and needs to be decoded
The content obtained varies across different versions of Exchange, with some common elements as follows:
- DisplayName
- LegacyDN
- AutoDiscoverSMTPAddress
Notably, AD represents the computer name of the domain controller. Information about AD can be obtained in Exchange 2013 and older versions, but not in Exchange 2016
The implementation code for the above can be referenced in the checkautodiscover function in checkAutodiscover.py
A previous article, 'Penetration Techniques—Accessing Internal File Shares via Exchange ActiveSync', introduced a method to access the domain shared directory SYSVOL via Exchange ActiveSync. The path here needs to specify the computer name of the domain controller
Correct format:
\\dc1\SYSVOL\test.com\Policies\{6AC1786C-016F-11D2-945F-00C04fB984F9}\GPT.INI |
Incorrect format:
\\test.com\SYSVOL\test.com\Policies\{6AC1786C-016F-11D2-945F-00C04fB984F9}\GPT.INI |
By combining the above two points, the complete implementation of reading files from the domain shared directory SYSVOL can be achieved
To support Exchange 2016, a more universal method (supporting all versions) for obtaining the domain controller computer name is introduced here: by reading the current user's configuration information through EWS, thereby obtaining the domain controller's computer name.
Reference:
https://docs.microsoft.com/en-us/exchange/client-developer/exchange-web-services/how-to-get-user-settings-from-exchange-by-using-autodiscover
Note that the request URL should be /autodiscover/autodiscover.svc, not /EWS/Exchange.asmx.
Example of the SOAP format to send:
|
Note that {domain} must be a domain name, not an IP address
In the returned results, ActiveDirectoryServer represents the computer name of the domain controller, as shown in the figure below
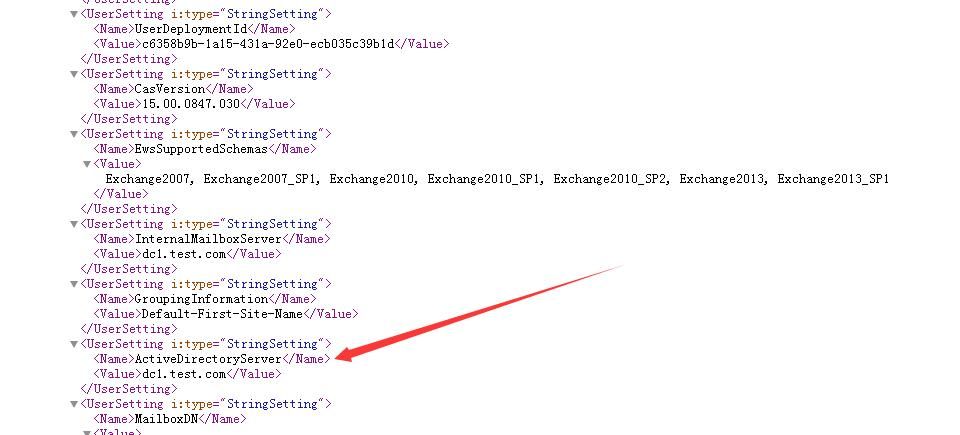
Implementation code can refer to the getusersetting function in checkAutodiscover.py
0x04 Method to Access Exchange Mail Resources via Autodiscover
---
After completing authentication via Autodiscover, MAPI OVER HTTP can be used to access Exchange mail resources
Note:
MAPI OVER HTTP is the default communication protocol between Outlook and Exchange 2016
MAPI OVER HTTP is a new transport protocol implemented in Exchange Server 2013 Service Pack 1 (SP1), replacing RPC OVER HTTP (also known as Outlook Anywhere)
MAPI OVER HTTP is not enabled by default in Exchange 2013; the communication protocol between Outlook and Exchange uses RPC OVER HTTP
For reference on MAPI OVER HTTP:
https://docs.microsoft.com/en-us/openspecs/exchange_server_protocols/ms-oxcmapihttp/d502edcf-0b22-42f2-8500-019f00d60245
https://interoperability.blob.core.windows.net/files/MS-OXCMAPIHTTP/%5BMS-OXCMAPIHTTP%5D.pdf
ruler also supports some functions of MAPI OVER HTTP and can be used as a reference
1. Execute command
Process:
- connect
- execute
- disconnect
2. Read GlobalAddressList via Offline Address Book (OAB)
Using checkAutodiscover.py
(1) Obtain OABUrl through Autodiscover
Command example:
python checkAutodiscover.py 192.168.1.1 443 plaintext [email protected] DomainUser123! checkautodiscover |
Result as shown in the figure below
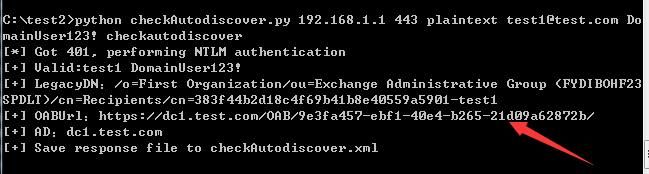
Obtained OABUrl is https://dc1.test.com/OAB/9e3fa457-ebf1-40e4-b265-21d09a62872b/
(2) Access OABUrl to find the lzx file name corresponding to Default Global Address
Command example:
python checkAutodiscover.py 192.168.1.1 443 plaintext [email protected] DomainUser123! checkoab |
Result as shown in the figure below

Obtained Default Global Address is 4667c322-5c08-4cda-844a-253ff36b4a6a-data-5.lzx
(3) Download lxz file
Command example:
python checkAutodiscover.py 192.168.1.1 443 plaintext [email protected] DomainUser123! downloadlzx |
Result as shown in the figure below
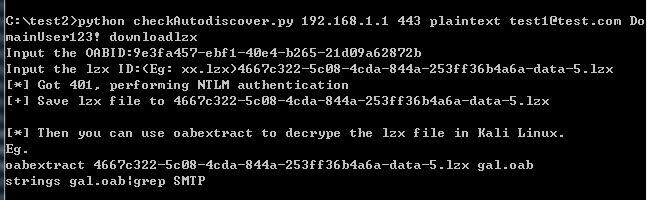
(4) Decode the lxz file
Using the tool oabextract
Installation required after download
Download link for a pre-compiled version ready to use directly on Kali: http://x2100.icecube.wisc.edu/downloads/python/python2.6.Linux-x86_64.gcc-4.4.4/bin/oabextract
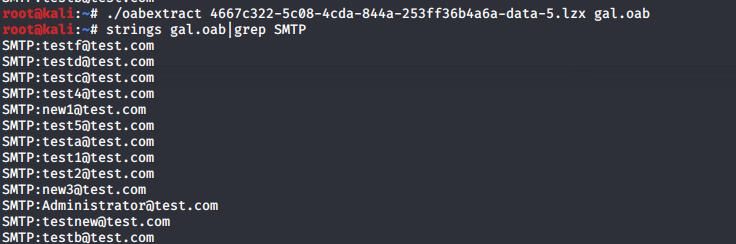
Command example to convert lzx file to oab file:
oabextract 4667c322-5c08-4cda-844a-253ff36b4a6a-data-5.lzx gal.oab |
Command example to extract GAL:
strings gal.oab|grep SMTP |
Result as shown in the figure
0x05 Summary
---
This article introduces methods for password brute-forcing via Autodiscover, reading configuration information, and accessing Exchange email resources, along with open-source implementation code and exploitation ideas.