GoAnywhere Managed File Transfer Vulnerability Debugging Environment Setup
0x00 Preface
This article records the details of building a GoAnywhere Managed File Transfer vulnerability debugging environment from scratch.
0x01 Introduction
This article will cover the following content:
GoAnywhere Managed File Transfer Installation
GoAnywhere Managed File Transfer Vulnerability Debugging Environment Configuration
Database Operations
0x02 GoAnywhere Managed File Transfer Installation
References: https://static.fortra.com/goanywhere/pdfs/guides/ga6_8_6_installation_guide.pdf
Download Link: https://www.goanywhere.com/products/goanywhere-free/download
Requires registering an account to obtain a license
GoAnywhere Managed File Transfer can be installed on Windows and Linux operating systems respectively
Default Web Path on Windows System: C:\Program Files\HelpSystems\GoAnywhere\tomcat\webapps\ROOT
Default Web Path on Linux System: /usr/local/HelpSystems/GoAnywhere/tomcat/webapps/ROOT
1. Enable remote debugging function
This is achieved by enabling Tomcat debugging function; the method to enable Tomcat debugging function is as follows:
Switch to the bin directory
Execute the command: catalina jpda start
After Tomcat debugging function is enabled, it listens to the local port 8000 by default
For GoAnywhere Managed File Transfer, the method to enable debugging function is as follows:
(1) Debugging on Windows
Modify the file properties of C:\Program Files\HelpSystems\GoAnywhere\tomcat\bin\GoAnywhere.exe
Double-click the file C:\Program Files\HelpSystems\GoAnywhere\tomcat\bin\GoAnywhere.exe, switch to the Java tab, and add the following to Java Options: -agentlib:jdwp=transport=dt_socket,server=y,suspend=n,address=8090, as shown in the figure below
Restart the GoAnywhere service
(2) Debugging on Linux
Modify the file: /opt/HelpSystems/GoAnywhere/tomcat/bin/start_tomcat.sh, change exec "$PRGDIR"/"$EXECUTABLE" start "$@" to exec "$PRGDIR"/"$EXECUTABLE" jpda start "$@"
Modify the file: /opt/HelpSystems/GoAnywhere/tomcat/bin/goanywhere_catalina.sh, change JPDA_ADDRESS="localhost:8000" to JPDA_ADDRESS="*:8090"
Note:
The default debugging port 8000 of Tomcat conflicts with the Web port of GoAnywhere Managed File Transfer, so here we choose to modify Tomcat's default debugging port to 8090
Open the firewall to allow external access to port 8090: iptables -I INPUT -p tcp --dport 8090 -j ACCEPT
Start the GoAnywhere process: /opt/HelpSystems/GoAnywhere/goanywhere.sh start
0x03 Database Operations
GoAnywhere Managed File Transfer uses the Apache Derby database
Default database storage location under Windows: C:\\Program Files\\HelpSystems\\GoAnywhere\\userdata\\database\\goanywhere
Default database storage location under Linux: /opt/HelpSystems/GoAnywhere/userdata/database/goanywhere/
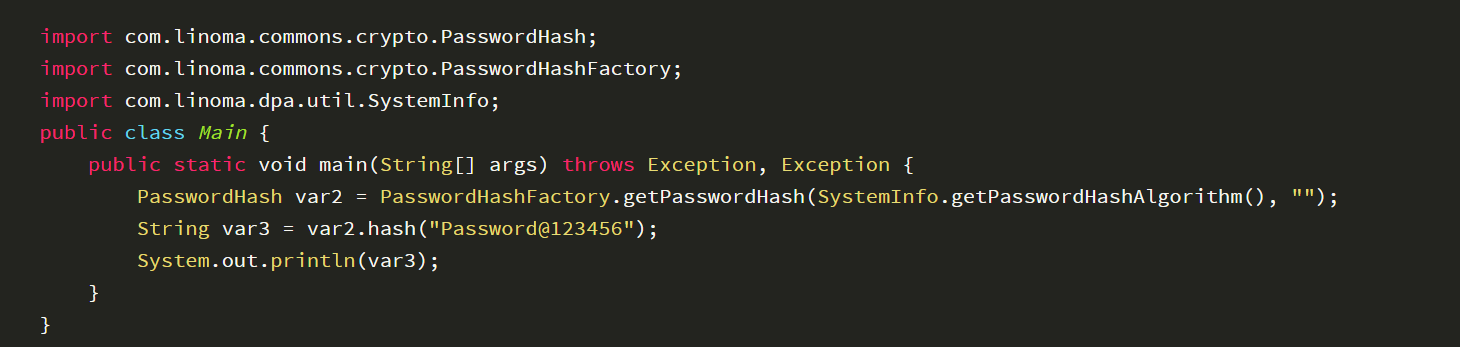
Implementation details of database operations can be obtained from the ga_classes.jar file in the lib folder
From this, we can get the implementation details of Web user password encryption, corresponding location: C:\\Program Files\\HelpSystems\\GoAnywhere\\lib\\ga_classes.jar!\\com\\linoma\\ga\\ui\\admin\\action\\user\\ChangeUserPasswordAction.class
The extracted Java implementation code is as follows:
1. Read Derby Database
(1) Command-line Implementation
Use Apache Derby, download address: https://archive.apache.org/dist/db/derby/db-derby-10.14.2.0/db-derby-10.14.2.0-bin.zip
Run ij.bat in the bin directory
Connect to the database: connect 'jdbc:derby:C:\\Program Files\\HelpSystems\\GoAnywhere\\userdata\\database\\goanywhere;';
Query user configuration: SELECT * FROM DPA_USER;
(2) GUI Implementation
Use DBSchema, download link: https://dbschema.com/download.html
After launching DBSchema, select to connect to the Derby database, choose derbytools.jar org.apache.derby.jdbc.EmbeddedDriver as the JDBC Driver, and select C:\\Program Files\\HelpSystems\\GoAnywhere\\userdata\\database\\goanywhere for the Folder.
Query the user data table, as shown in the following figure
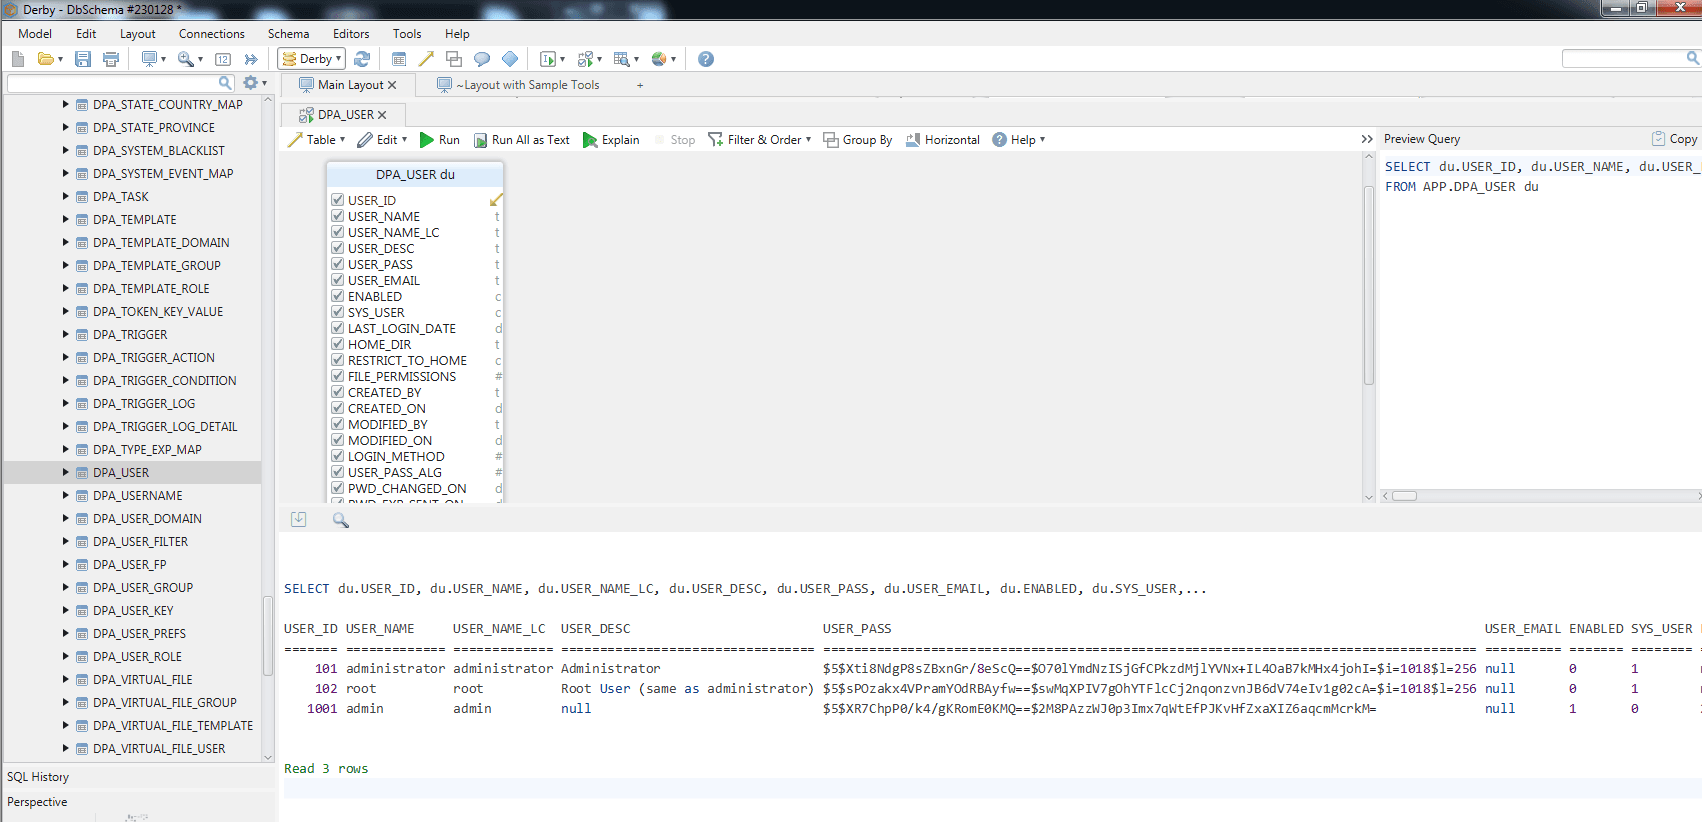
You can see there are three default users as follows:
Administrator, disabled
root, disabled
admin, default user
2. Modify the Database
The Derby database of GoAnywhere Managed File Transfer uses embedded mode and is inaccessible to other applications, so there are two methods to modify the data as follows:
(1) GoAnywhere Managed File Transfer is running
Database modification can be achieved by writing a JSP file
(2) GoAnywhere Managed File Transfer is shut down
You can use Apache Derby or DBSchema to open the database folder and modify it directly
Example commands for modifying the database:
Enable root user: UPDATE APP.DPA_USER SET ENABLED='1' WHERE USER_NAME='root';
Set root user password: UPDATE APP.DPA_USER SET USER_PASS='$5$mpoe6zI4B6+LHRMdbFKr8g==$RnAILbYe9KDauKE3wXTFVvlXQNZeM4Z2c7x1aEtME/U=' WHERE USER_NAME='root';
0x04 Summary
Once we have set up the GoAnywhere Managed File Transfer vulnerability debugging environment, we can then start learning about the vulnerability.